Monday, March 7, 2016
White Chili with Avocado Cream
Diced chicken, ground pork, corn, beans, a punch of lime, and a big dollop of avocado cream make this one flavorful white chili! Perfect for chilly late winter nights!
Ah, chili. A source of argument and competition among both regions and friends. I love a good old fashioned chili cook-off just so I can taste the numerous takes on a basic dish. Not to mention the playful bantering and competition! In Texas, a true chili does not contain beans and is typically pretty darn spicy. In Cincinnati, of course, it's a tad sweet (man, I love Cincinnati chili and spaghetti)! Most chili's, it seems, are tomato based in some way. While tasty, they sure seem heavy - though they are perfect for brutal winter nights!
A white chili, in my opinion, is a tad lighter. I can easily nosh on white chili into the spring months. The flavors tend to be a bit brighter - especially in this version! The avocado cream, lime juice, and white corn make this nearly a spring dish.
I'm not gonna lie - this chili isn't a quick weeknight meal. I will promise you that it's worth it and not near as complicated as it seems. It'd be a great Sunday night meal - and you'll have leftovers for lunch the next day!
White Chili with Avocado Cream
1 serrano chili
1 jalapeno pepper
1 medium onion, peeled and halved
4 cups unsalted chicken stock, divided
2 tablespoons flour
1 chipotle in adobo sauce (just 1 pepper - not the whole can)
2 (15-ounce) cans cannellini beans, rinsed, drained, and divided
8 garlic cloves, minced
1 tablespoon ground cumin
1 teaspoon ground oregano
3/4 teaspoon ground coriander
1 lb ground pork
2 tablespoons cornstarch
1/4 cup cold water
2 lbs boneless/skinless chicken breasts, cut into bite sized pieces
16 ounce bag frozen white corn
1 (15-ounce) can chickpeas, rinsed and drained
1 cup half-and-half
1/2 cup chopped cilantro
1/2 cup + 2 teaspoons lime juice
1 medium avocado
1/3 cup sour cream
Olive oil
Cooking spray
Salt and pepper, to taste
Preheat broiler to high.
Place the serrano, jalapeno, and onion halves on a foil lined baking sheet. Coat the vegetables with cooking spray and place the baking sheet in the oven. Broil for 15 minutes, turning occasionally, until charred on all sides. Remove from oven and wrap the serrano and jalapeno in foil; let stand 5 minutes. Peel the peppers then halve them, discarding the stems and seeds.
Place the peppers, onion, 1/2 cup stock, flour, chipotle pepper, and 1 can cannellini beans in a food processor. Process until smooth.
Heat a large Dutch oven over medium-high heat. Add a couple tablespoons olive oil to the pan and swirl to coat. Add the garlic and saute 30 seconds. Add the cumin, oregano, and coriander; saute 30 seconds. Add the ground pork and cook 4 minutes, stirring to crumble. Add the pureed onion mixture and remaining 3.5 cups stock. Bring to a boil, reduce heat, and simmer 20 minutes, stirring frequently.
In a small bowl, whisk together the cornstarch and cold water until smooth; gradually pour into pot. Add the diced chicken and cook 5 minutes. Stir in the remaining can of cannellini beans, frozen corn, and chickpeas; cook 7 minutes. Reduce heat to medium-low then stir in half-and-half, cilantro, and 1/2 cup lime juice; cook 3 minutes. Add salt to taste.
In a small bowl, mash the avocado. Stir in sour cream, remaining 2 teaspoons lime juice, and salt to taste.
Top each serving with avocado cream.
Source: adapted from Cooking Light
Wednesday, March 2, 2016
Starbucks Copycat Lemon Loaf
Incredibly moist and bursting with lemon flavor, this easy lemon loaf is whipped up in just 1 bowl!
Cliche as it may be, I'm a Starbucks addict. I'm one of those people who know the staff and they always start my order when they see me walk in. I'm not a $7 drink person; I'm an iced coffee addict and theirs is pretty reasonably priced. Their food, however, is pretty overpriced so I rarely order it. My husband does not do coffee (or really, any drink that Starbucks offers) but he loves their lemon loaf! Occasionally, if he's with me on one of my iced coffee runs, he asks for a slice to go.
Their lemon loaf really is fantastic, but it's pricey! I can make this entire loaf for probably half of a single slice at Starbucks. The ingredient list has nothing weird, you don't need to use every mixing bowl in your cabinet (just 1!), and you don't even need a hand mixer. That's my kind of baking!
The verdict was two thumbs up in this house. It's moist and really loaded with lemon flavor! I think it may even be better than Starbucks... but don't tell my favorite baristas!
Do make sure your extract isn't old (ie: not alcohol-y); I actually had to replace mine before making this recipe because mine was more alcohol than lemon in flavor. The glaze can be thickened to your liking. I like mine thin, drizzly, and really soaked into the loaf so I sliced my cake and then drizzled the glaze so each layer really absorbs the lemon flavor.
Don't make this right before going to bed. You might find yourself eating a few slices alone in a dark kitchen. Not that that happened to me.
Starbucks Copycat Lemon Loaf
For the loaf:
3 large eggs
1 cup granulated sugar
1 cup sour cream or Greek yogurt
1/2 cup canola or vegetable oil
2 tablespoons lemon zest
2.5 tablespoons lemon extract, or to taste
1 1/2 cups all-purpose flour
2 teaspoons baking powder
1/2 teaspoon salt, or to taste
For the glaze:
1 cup confectioners' sugar
3 tablespoons lemon juice, or as needed for consistency
Preheat oven to 350. Coat a 9x5-inch loaf pan with floured cooking spray and set aside.
In a large bowl, combine the eggs, sugar, and yogurt or sour cream. Whisk vigorously until smooth and well combined. Drizzle in the oil and continue whisking until combined. Add the lemon zest and lemon extract; whisk to combine. Add the flour, baking powder, and salt; stir to combine but don't overmix. It's okay if there are some lumps present.
Transfer the batter into the prepared pan and smooth the top with a spatula. Bake for 40 minutes. Carefully pull the pan out and loosely drape a sheet of foil over top to help prevent over browning. Place back in the oven and cook another 10-12 minutes or until the top is domed and a toothpick inserted in the center comes out clean.
Place the pan on a wire rack and let cool for at least 30 minutes before glazing.
To make the glaze, in a small bowl add the confectioners' sugar and slowly drizzle in the lemon juice, whisking as you go. Add juice until it's your desired consistency.
Drizzle the glaze over the loaf before serving. As noted above, I like slicing mine before drizzling so that glaze gets in between the slices.
Store airtight at room temp.
Source: Recipe slightly adapted from Averie Cooks
Sunday, February 28, 2016
Teriyaki Pork Chops and Pineapple Rice (one pot)
Teriyaki marinated and glazed lean pork chops are browned then nestled in pineapple rice. This delicious Asian twist is done in just one pot and in record time!
So, did y'all watch Fuller House this weekend? When I think of my childhood, Full House was always playing a starring role! My dad used to complain when we sat down to watch it because it was so cheesy but we kids loved it! I was super excited to see the Netflix reboot and just hoped it would live up to hype. I'm sure the critics hate it but it was cheesy, nostalgic, and I loved every second.
Yup, I finished the entire thing on Friday. The benefit of having Fridays off!
Sometimes I start binging on a show and the last thing I want to do is get off the couch to make dinner. Like that segway into this recipe? Ha!
But seriously, weeknight friendly one pot dishes are the most used in this house - either due to my bingewatching or just a long workday. Some one pot recipes end up being bland but not this one! The homemade teriyaki sauce and pineapple juice make it both sweet and savory and using lean pork chops (as opposed to the ever present chicken breasts) is a great change!
Note: Wondering why I have more than 4 pieces of pork pictured? I trimmed my chops into small pieces, which meant adding them to the rice later as they cooked faster.
Teriyaki Pork Chops & Pineapple Rice
4 boneless pork chops
1.5 cups long grain white rice
1 (20 ounce) can crushed pineapple
olive oil
For the teriyaki sauce:
1/2 cup soy sauce
1/2 cup sugar
1/4 cup cider vinegar
1 teaspoon garlic powder
1/2 teaspoon ground ginger
1/2 teaspoon salt
1/4 teaspoon black pepper
2 teaspoons cornstarch
In a small bowl, whisk together the teriyaki sauce ingredients. Pour 1/3 cup of the sauce + 1 tablespoon olive oil to a freezer bag. Add the pork, refrigerate, and let marinate for at least an hour (up to 8 hours). Place the remaining teriyaki sauce in a bowl, cover, and refrigerate until ready to use.
When ready to cook, strain the pineapple, separating the juice and the crushed pineapple. Pour the juice in a measuring cup and add water until there is 3.5 cups liquid total. Set that and the crushed pineapple aside.
In a large nonstick skillet, turn the heat to medium and add the refrigerated teriyaki sauce. Bring to a boil then reduce heat to simmer and stir constantly until the sauce is slightly thickened. Remove back to the original bowl and set aside.
With a paper towel, quickly wipe out the skillet and then heat 1 tablespoon olive oil over high heat. Using tongs, pull each piece of pork from the marinade and let excess drip back into the bag. Add the pork to the skillet and cook around 3 minutes on each side, or until nicely browned. It will not be cooked through all the way. Remove to a plate.
Wipe out skillet again and add 1 tablespoon olive oil and reserved pineapple/water mix. Bring to a simmer and stir in reserved crushed pineapple and rice. Cover, reduce heat to medium low, and cook for 12 minutes. Stir rice and nestle browned pork chops on top. Brush each piece of pork with the reserved teriyaki sauce. Cover and continue to cook for an additional 8-12 minutes, or until the rice and pork is cooked through.
Brush pork with additional teriyaki sauce and season rice with salt and pepper before serving.
Source: adapted from Carlsbad Cravings
Tuesday, February 23, 2016
Ham and Spinach Oven Risotto
Love risotto but hate babysitting a pot? This baked risotto is for you! Mostly hands off cooking can still result in the creamy texture we all love. This version uses ham, spinach, and lots of cheese to make it an easy, one dish meal!
I call this recipe my "oh crud" recipe. When I realize I forgot to thaw the chicken for dinner, I know I can toss this dish together in minutes using stuff I find on hand. Don't you love having those recipes in your back pocket? I originally was passed this recipe from a friend and it's one of our favorites! It's creamy, cheesy, and loaded with deliciousness.
The thing is, the ham and spinach can easily be swapped for other stuff. So could the cheese! I've used shredded rotisserie chicken, crumbled bacon, blanched asparagus, and a host of other things I find shoved in my fridge. It all comes out beautifully! That's what makes this recipe so amazing - it's versatile! Ham, spinach, and mozzarella happen to be our favorite combination but you could try any variety of things.
Ham & Spinach Oven Risotto
2 tbsp butter
2.5 cups chicken broth
1 cup Arborio rice
1 clove garlic, minced
1/2 teaspoon sea salt
2 cups cooked ham, diced (I love using leftover honeybaked ham!)
8 oz shredded mozzarella
2 cups baby spinach
Preheat oven to 400.
Place the butter in a 9x13 pan and bake 5 minutes or until melted. Remove from oven and stir in broth, rice, garlic, and salt. Cover the pan with foil and bake for 35 minutes.
Remove from oven, fluff with fork, and stir in diced ham, mozzarella, and spinach. Return to oven for 5-10 minutes to warm through.
Serve hot.
Saturday, February 20, 2016
Lemony Spinach and Artichoke Baked Ziti
If you like spinach & artichoke dip, you'll love it transformed into pasta! Cheesy, creamy, and with 2 green veggies, it totally counts as health food :)
I'm back with yet another pasta dish! I just can't get enough of them - which is probably why I'm no skinny minnie. In this house, we're all about 1 dish meals. Saves on dishes, saves on time, and it's easy to eat sitting in front of the TV. Pasta typically fits the bill, unfortunately (or fortunately for my taste buds!).This was delicious, slightly sinful, and easy enough for a weeknight!
My cast-iron skillet was once again my go-to pan. Using an oven safe skillet will make this recipe super simple and cut down on the dishes. If you don't already own a cast iron pan (or 3), you should. They are cheap, easy to clean, and are a breeze to cook with. I'm up to 8 now and my old Calphalon pans have slowly been pushed to the back of the cabinet. Cast iron is not just for campfires!
Lemony Spinach & Artichoke Baked Ziti
1 lb rigatoni
1 (5 oz) bag baby spinach
For the filling:
3 tbsp butter
1 tbsp olive oil
1 large onion, diced
1 lb frozen artichoke hearts
¼ cup dry white wine
1 cup grated Parmigiano-Reggiano cheese
2 large egg yolks
1 tbsp lemon juice
½ tsp kosher salt
black pepper, to taste
For the sauce:
4 tbsp butter
¼ cup all purpose flour
2 cups 2% milk
½ cup ricotta
2 tbsp lemon juice
½ tsp salt
black pepper, to taste
Heat oven to 350.
Bring a large pot of salted water to a boil. Cook the rigatoni according to package directions, adding the baby spinach to the pot in the last minute of cooking. Drain and set aside.
Meanwhile, for the filling, melt the butter in a large heavy-bottomed oven safe skillet (like cast iron) over medium heat and cook until it turns amber. Add 1 tbsp of olive oil, followed by the onion, and cook until the onion starts to caramelize, about 7 minutes. Add the artichoke hearts and cook until they are warmed through and softened, about 5-7 minutes. Add the wine and simmer until it evaporates.
Remove the pan from the heat and transfer the artichoke mixture to the bowl of a food processor. Add the grated cheese, egg yolks, lemon juice, salt, and black pepper to the food processor bowl and pulse until combined, but still coarse. Set aside.
To make the sauce, melt the butter in a medium saucepan over medium-high heat. Add the flour and whisk until smooth. Whisk in the milk, a little bit at a time, until it is all added and has reached a batterlike consistency. Bring to a simmer and let it thicken, whisking constantly. Whisk in the ricotta, lemon juice, salt and black pepper. Season to taste with more lemon juice and/or salt.
In the oven safe skillet you used for the filling, gently mix together the drained pasta and spinach, artichoke filling, and sauce. Cover with foil and bake for 30 minutes. Remove foil and bake another 15 minutes.
Source: adapted from Eats Well With Others
Tuesday, February 16, 2016
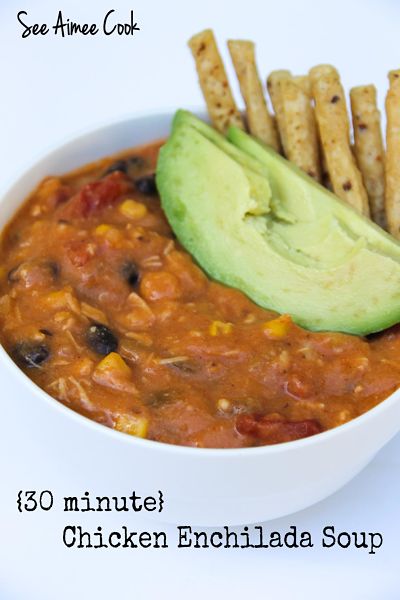
Chicken Enchilada Soup (30 minute!)
Who doesn't love chicken enchilada soup?! This version is thick, creamy, and loaded with cheese and chicken. Bonus? It's done in 30 minutes! Yes, you CAN make a deeply flavorful soup without it simmering all day.
Some enchilada soup is thin - this crockpot version I've shared before is broth-y. Delicious, but not thick. I personally love it both ways but there is something comforting when you're inhaling a big bowl of thick soup. Sorta like you don't need anything else to make it a meal, you know?
The key to thickening this soup is masa harina, a Mexican flour typically used to make corn tortillas. The flavor works better than all-purpose flour and it thickens beautifully. You should be able to find it in the baking aisle of any major grocery store.
Thanks to a store bought rotisserie chicken, and some canned veggies, you can have this soup ready to go in just 30 minutes!
{30 minute} Chicken Enchilada Soup
2 tablespoons vegetable oil
1 small onion, diced
2 cloves garlic, minced
1/2 cup masa harina
3 cups chicken stock
2 cups cooked, shredded chicken (from a rotisserie chicken)
2 (10-ounce) cans red enchilada sauce
1 (14-ounce) can black beans, rinsed and drained
1 (14-ounce) can fire roasted diced tomatoes (with their juices)
1 (4-ounce) can chopped green chiles (mild if you don't want spicy)
1 cup frozen corn
1/2 teaspoon ground cumin
8 ounces sharp cheddar cheese, freshly grated
salt, to taste
optional toppings: sliced avocado, additional grated cheese, sour cream, chopped cilantro, etc.
Heat the oil in a large stockpot over medium-high heat. Add the onions and cook, stirring often, until translucent and softened, about 5 minutes. Add the garlic and cook another minute. Stir in the masa harina and cook another minute.
Pour in half the chicken stock and stir until completely combined, Add the remaining stock, chicken, enchilada sauce, black beans, tomatoes, green chiles, corn, and cumin. Stir occasionally until the soup comes to a simmer. Reduce heat to medium-low and let simmer for 3 minutes, stirring often to avoid sticking. Stir in the cheese, a little at a time, until melted and smooth. Taste and add salt if needed.
Serve with optional toppings.
Source: slightly adapted from Gimme Some Oven
Wednesday, February 10, 2016
Carbonara with Seared Scallops
Just in time for Valentine's Day! Make this restaurant quality dish at home in minutes (and a whole lot cheaper!).
Let's be real. There are few things less drool worthy than a big bowl of pasta carbonara. Pasta is tossed with copious amounts of crispy bacon bits and coated in a sinful cream sauce. Since my husband believes meat is a must, I paired mine with seared scallops - making it the ultimate weeknight splurge!
Man, I love scallops. And pasta. And cream. And cheese.
This would be an easy (and impressive!) Valentine's Day dinner to whip up this weekend. Or just a "I barely survived the workday and need a bowl of pasta" dinner. Not that I ever have those nights.
I use a pound of bacon because, well, bacon, but feel free to cut back if you're not as fanatical about it as I evidently am.
Carbonara with Seared Scallops
1 lb spaghetti
1 lb thick cut bacon, diced into small pieces
1 tablespoon vegetable oil
1 lb sea scallops, beard removed and patted very dry
1 tablespoon butter
3 eggs
3/4 cup finely grated Parmesan
3/4 cup heavy cream
salt and pepper
Bring a large pot of water to a boil and cook the spaghetti according to package directions. Drain, reserving a cup of pasta water, and return the pasta to the pot. Put the lid back on to help keep it warm.
Meanwhile, in a large saute pan or cast iron skillet, fry the bacon pieces until crispy. Remove to a paper towel lined plate with a slotted spoon. Wipe out the pan with a paper towel and return to the stove.
Add the vegetable oil to the pan and bring to a high heat. Salt and pepper both sides of each scallop. Once the oil is shimmering, add the scallops to the pan, making sure they are not touching. Let cook for 2 minutes or until there is a nice deep sear on one side. Carefully flip and add the butter to the pan. Cook another 90 seconds or so, spooning the melted butter over top of each scallop to help them finish cooking.
In a small bowl, whisk together the eggs, Parmesan, cream, and lots of salt and pepper. Slowly drizzle the mixture into the pot of hot drained pasta, mixing well with tongs. Add the crispy bacon, salt, and pepper and mix well. Add small amounts of the reserved pasta water, if needed, to thin it out.
Top each serving with 3-4 scallops nestled on top. Serve immediately.
Monday, February 8, 2016
Warm Lemon Pudding Cake
The perfect mix of pudding and cake - served hot! The lemon fan in your house will LOVE this easy dessert!
My husband is a huge lemon fan so I'm always on the hunt for new lemon flavored desserts to try. A friend passed this one on and we've been making it for years! We especially love it during the winter months when a warm dessert is even more appealing. Yeah, it's not the most photogenic dessert but I promise it's absolutely delicious.
This dessert is easy thanks to some store-bought helpers, such as boxed cake mix and packaged lemon pudding mix. Pair those items with some pantry/fridge staples and you can quickly whip it up. It makes an entire 9x13 pan and is very rich so a little goes a long way. This is perfect for potlucks, family gatherings, or company!
Warm Lemon Pudding Cake
1 (15.25 ounce) box yellow cake mix + ingredients needed for cake
2 (1 ounce) boxes instant lemon pudding mix
1/3 cup sugar
1 1/4 cup water
2 cups cold milk
2 tablespoons powdered sugar
Preheat oven to 350 degrees and lightly spray a 9x13 baking dish.
Prepare cake mix as directed on package and pour the batter into the reserved baking dish.
Pour the milk and water into large bowl. Add the dry pudding mixes and sugar and whisk 2 minutes or until well blended. Pour over the cake batter and gently swirl with a fork mix together a bit.
Place the pan on a rimmed cookie sheet to catch drippings and bake 55 minutes to 1 hour or until a toothpick inserted into the middle comes out clean. Cool in the pan for 20 minutes and then sprinkle with powdered sugar.
Spoon into serving dishes and serve warm.
Wednesday, February 3, 2016
Spicy Thai Steak Coconut Curry Noodle Bowls
The perfect meal in a bowl! Creamy coconut-curry noodles are topped with carrots, cabbage, and thinly sliced steak. Start to finish, you can be enjoying this dish in 30 minutes!
I am a noodle addict! When I menu plan, the noodle based dishes are always the ones I'm most drawn to (unfortunately!). Who doesn't love a carb based meal? Noodles don't always have to be used in Italian based meals; they are also delicious in Thai dishes! This noodle bowl is not at all authentic, but it sure is tasty!
The noodles are coated with a gorgeous curry-coconut sauce (that I could eat just on it's own!) but then you throw in some matchstick carrots, crunchy cabbage, and thinly sliced steak. Have some spare veggies sitting around the produce drawer? Throw them in too! Cut them into bite size pieces and stir fry alongside the carrots until your desired doneness.
Spicy Thai Coconut Curry Noodle Bowls
For the sauce:
1 tablespoon oil
1 shallot, thinly sliced
1 tablespoon grated or minced fresh ginger
2 tablespoons green curry paste
1 (14 ounce) can light coconut milk
3 tablespoons sugar
1 tablespoon chili garlic sauce
2 tablespoons fish sauce
2 tablespoons soy sauce
For the bowls:
8 ounce package lo mein noodles
1 tablespoon oil
3/4 lb sirloin steak, thinly sliced into 3 inch pieces
1 carrot, cut into matchsticks
10 ounce bag thinly sliced cabbage (cole slaw mix)
2 green onions, thinly sliced
First, soak the noodles in a bowl of hot water for 25 minutes. Drain and rinse.
While the noodles soak, heat the oil in a large Dutch oven over medium heat. Add the shallots and ginger and cook, stirring often, for 3 minutes. Add the curry paste and cook for 1 minute. Add the coconut milk, sugar, chili garlic sauce, fish sauce, and soy sauce. Simmer 15 minutes - it should thicken a bit.
While the sauce simmers, heat 1 tablespoon oil in a wok over high heat. Add the steak and cook on each side about 1 minute. Remove and set aside. Add the carrots and cook about 2 minutes. Add the drained noodles to the carrots and stir fry about a minute.
Add the noodles/carrots to the Dutch oven and, using tongs, gently mix util the noodles are coated well. Add the steak and allow to heat through.
Top each bowl with a scoop of cabbage and green onions.
Source: sauce recipe adapted from Pinch of Yum
Monday, February 1, 2016
King Ranch Chicken Casserole
A Texas staple! This Tex Mex comfort food favorite is loaded with chicken, tortillas, spicy tomatoes, and loads of cheese. A cream soup-free version that is easy to whip up!
Not long ago, I realized that I was completely missing a Texas favorite in my recipe index - King Ranch Chicken Casserole! This casserole is a favorite of most Texans, though it's typically made with cream soup, which I avoid. Making it from scratch is still super easy and tastier, in my opinion.
If you've never had it, think of it as similar to chicken enchilada casserole. Layers of corn tortillas, chicken, and tomatoes are baked together in a creamy cheese sauce. The spice is very mild; if you like spicy, toss in a can of chopped green chiles along with your Rotel tomatoes.
King Ranch Chicken Casserole
15 corn tortillas
1 tablespoon butter
1 large onion, finely chopped
2 jalapenos, stemmed, seeded, and minced
2 teaspoons ground cumin'
2 (10-ounce) cans Ro*tel diced tomatoes & green chilies
5 tablespoons flour
1 cup heavy cream
3 cups chicken broth
1.5 pounds boneless/skinless chicken breasts, cut into 1/2-inch cubes
4.5 cups shredded Colby Jack cheese
2 tablespoons minced fresh cilantro
salt and pepper, to taste
Heat oven to 450. Spread the tortillas on 2 baking sheets, not overlapping, and coat both sides with cooking spray. Bake until slightly crisp and browned, about 12 minutes. Cool slightly and then break into bite sized pieces. Repeat, if needed, until all 15 tortillas are baked. Put aside 3 tortillas worth of pieces for the topping.
Meanwhile, in a Dutch oven, melt the butter over medium-high heat. Add the onions, jalapenos, and cumin and cook until lightly browned, about 8 minutes. Stir in the Rotel tomatoes (and their juices) and cook until most of the liquid has evaporated, about 10 minutes.
Stir in the flour and cook for 1 minute. Stir in the cream and broth, bring to a simmer, and cook until thickened, 2-3 minutes. Season with salt and pepper to taste. Stir in the cubed chicken and cook until no longer pink, about 4 minutes. The chicken should be slightly underdone.
Remove from heat and stir in 3.5 cups of the cheese and cilantro until the cheese has melted.
In a 9x13 pan, scatter half of the tortilla pieces on the bottom. Spoon half of the filling over top. Scatter the other half of the tortillas pieces over top of the filling layer and then spoon the rest of the filling over top.
Place the pan on a rimmed baking sheet and bake until bubbling, about 15 minutes. Remove from oven and sprinkle the reserved 3 tortillas worth of pieces over top followed by the remaining 1 cup of cheese. Return to the oven and bake another 10 minutes. Remove from oven and let sit 10 minutes before serving.
Source: adapted from America's Test Kitchen: The New Family Cookbook
Tuesday, January 26, 2016
Grapefruit and Sugar Rubbed Pork Tenderloin
A marinade of grapefruit, brown sugar, and spices create a delicious caramelization on this roasted pork tenderloin! Take advantage of peak season grapefruit this winter!
Are you a grapefruit fan? I like grapefruit in things, but not necessarily on it's own. My mom would often eat it sprinkled with some salt! Grapefruit actually pairs best with something a bit salty and savory as it brings out the subtle sweetness it contains. Which makes it a perfect accompaniment to meat!
Even if you don't love grapefruit (my husband doesn't), I think you'll still love the caramelization and flavor this marinade has. It does not have a heavy grapefruit flavor (though the accompanying sauce certainly does, the pork is still delicious without it).
Grapefruit & Sugar-Rubbed Pork Tenderloin
2 grapefruit, 1 pink or red and 1 white
1 cup packed dark brown sugar
1 tablespoon smoked sweet paprika
1/2 teaspoon ground cumin
1/2 teaspoon ground fennel
1/4 teaspoon cayenne
5 cloves garlic, peeled
1 (1.5 lb) pork tenderloin
salt and pepper, to taste
Preheat oven to 450.
First, zest and supreme the grapefruit. Add the zest, grapefruit segments, brown sugar, paprika, cumin, fennel, cayenne, garlic and a pinch of salt to a food processor. Puree until very smooth and transfer to a large bowl. Add the pork, toss to combine and cover with plastic wrap. Let sit at room temperature for 15 minutes.
Place a wire rack over a foil lined baking sheet. Transfer the pork to the rack and pour the remaining marinade in a small saucepan. Bake the pork until slightly caramelized on the outside and measuring 140 degrees, 20-25 minutes.
Meanwhile, bring the reserved marinade to a boil over high heat. Reduce heat to medium-high and boil gently, stirring often, until reduced by half, about 12-15 minutes.
Let the pork rest 10 minutes before slicing. Serve with glaze.
Source: adapted from Saveur
Labels:
pork
Sunday, January 24, 2016
Loaded Baked Potato Soup
All the flavors of a loaded baked potato - in soup form! This creamy, thick soup is warm, hearty, and weeknight easy!
Anyone else loving that we've been forced to stay home a few days? Charlotte got mostly ice but enough to shut things down for the weekend. However, by next weekend it'll be nearly flip flop weather again so we certainly can't complain! Unfortunately, our neighbors to the north may be digging out a bit longer than that.
Winter weather has been a roller coaster so far this season so anytime I see low temps in the forecast, I don't waste a chance to make a cold day meal. You know those things you only want when it's frigid outside? Soups, stews, casseroles, etc. We had this soup recently and I couldn't wait to share it!
This soup is quickly done on the stove top with very little prep work so it's weeknight easy. It's very thick - you will question yourself at first but stay with me, the potatoes really thicken it up. So much that you may want to add more broth or milk to thin it some. I liked it super thick but Jason thinned his out a bit.
Don't be tempted to mix the bacon into the soup - nobody likes limp bacon. Save the crumbles to serve on each bowl so it holds the crispiness.
Loaded Baked Potato Soup
8 slices bacon
5 tablespoons butter
1/4 cup all-purpose flour
3.5 cups milk, plus more if needed
1 lb russet potatoes, peeled and cubed
2 green onions, thinly sliced (plus additional for garnish, if desired)
1.5 cup shredded cheddar cheese (plus additional for garnish, if desired)
1/2 cup sour cream
salt and pepper, to taste
On a foil lined baking sheet, spread out the slices of bacon. Place in the (cold) oven, turn the oven temp to 400, and set the timer for 20 minutes. When the timer goes off, remove the pan, allow to cool a few minutes, then crumble and set aside.
Meanwhile, in a large Dutch oven, melt the butter over medium heat. Once melted, whisk in the flour and cook for about a minute, or until light brown. Slowly whisk in the milk, about 1 cup at a time. Continue whisking until slightly thickened, about 2-3 minutes. Stir in the diced potatoes and green onions. Stir frequently as it comes to a boil.
Reduce heat to simmer and cook, stirring often to avoid sticking, until the potatoes are tender, 20-25 minutes. Stir in the cheese, sour cream, and a decent amount of salt and pepper (to taste). Add more milk (or even chicken broth) to thin out, if needed.
Serve each bowl topped with a healthy serving of reserved chopped bacon and garnishes, if desired.
Serves 4.
Source: adapted from Center Cut Cook
Tuesday, January 19, 2016
Homemade SpaghettiOs
This homemade version of my childhood favorite canned pasta with meatballs is 100x better than the kind found in the pantry!
This is my second time attempting homemade SpaghettiOs. I admittedly loved the canned stuff as a kid/poor college student but just couldn't buy it anymore. I desperately wanted a relatively easy way to fill my SpaghettiOs void! The first time flopped; my meatballs fell apart, my sauce was thin, and I was incredibly frustrated by the end.
Couple years later, I found the courage to try it again thanks to everyone's favorite America's Test Kitchen. Is there anything they can't do?
This time was a huge success! I desperately wanted to hoard the entire pot for myself but finally relented and let my husband enjoy it, too. It was relatively easy - took only 1 pot and about 45 minutes, much of which is hand's off. The use of an immersion blender shaves tons of time and hassle - you should definitely invest in one (they are around $15 and take up very little space!).
You could make your own pesto... but in this recipe, it's hardly worth the effort. Save the homemade version for dishes that let it shine!
Homemade SpaghettiOs
1 tablespoon olive oil
1 onion, finely chopped
1 carrot, peeled and finely chopped
3 garlic cloves, minced
3.5 cups chicken broth
1 (28-ounce) can diced tomatoes
8 ounces meatloaf mix (50% lean ground beef & 50% ground pork)
1/4 cup basil pesto
1/4 cup panko
salt and pepper
1 cup (4 ounces) ditalini
In a large Dutch oven, heat the oil over medium heat. Add the onion and carrot and cook, stirring often, until softened, about 5 minutes. Add the garlic and cook until fragrant, about 30 seconds. Stir in the broth and tomatoes with their juices. Simmer until the vegetables are tender, about 10 minutes.
Meanwhile, in a large bowl mix together the ground meat, pesto, panko, 1/8 teaspoon salt, and 1/8 teaspoon pepper. Pinch off heaping teaspoons of meat mixture and roll into small, 3/4-inch meatballs (there should be around 32 total).
Remove the pot from heat and puree the soup using your immersion blender. Once the soup is smooth, move the pot back to the burner and bring it back to a simmer. Stir in the pasta and carefully add the meatballs. Continue to simmer, uncovered, until the pasta is tender and the meatballs are cooked through, 10-12 minutes. Be careful when stirring to avoid breaking apart the meatballs.
Season with additional salt and pepper, if needed, and carefully ladle into bowls.
Source: adapted from America's Test Kitchen
Friday, January 8, 2016
(Easy!) Chicken Cordon Bleu
The easiest way to enjoy homemade chicken cordon bleu - without canned soups! Chicken, ham, Swiss cheese, and breadcrumbs are layered, baked, and topped with a sinful Parmesan-Dijon Cream Sauce.
With nearly 600 recipes shared - and many more attempted, failed, and not shared - it seems like I've tried my hand at making most "standard" meals. Just recently, I found myself making not one but two different dishes that are fairly mainstream but never made at home! The first of those was chicken cordon bleu.
We were recently at a church dinner and on the menu was chicken cordon bleu. I rarely order it out but knew I liked it,... however, I completely underestimated my husband's reaction. I'm quite confident that he licked his plate (and maybe mine?) while everyone was listening to the speaker upfront. It was a huge hit! I made a mental note that if I hadn't made it before, I must soon! Later that night, I combed the archives of the blog and realized I had never made it!
The church chef had put some work into his version and it was absolutely delicious. But he's a trained chef with a staff... and I'm tired, hungry, and lazy. Thankfully, this easy version is just as delicious as the more complicated version - and my husband was in heaven!
If you've never had chicken cordon bleu, you're in for a treat. You're just layering thin chicken breasts cutlets, deli ham, and Swiss cheese in a baking dish. Top it with some breadcrumbs and bake. Right before it's done, whip up a super easy Parmesan-Dijon Cream Sauce to
Y'all, it's so good.
Chicken Cordon Bleu
For the Cordon Bleu:
3 large, thick boneless, skinless chicken breasts, cut in half length-wise (to make 6 total thin chicken breast cutlets)
12 slices deli ham
1 cup bread crumbs
2 tablespoons butter, melted
1/2 pound thinly sliced Swiss cheese
For the Parmesan-Dijon Cream Sauce:
2 tablespoons butter
2 tablespoons all-purpose flour
1 cup milk
1 teaspoon chicken bouillon granules (or 1 bouillon cube, crushed)
1/2 teaspoon salt
1 tablespoon Dijon mustard
1/2 teaspoon Worcestershire sauce
1/2 cup grated Parmesan cheese
Lightly grease a 9x13 baking dish with cooking spray and preheat the oven to 350.
In a small bowl, combine the bread crumbs and melted butter. Set aside.
Place the cut chicken breasts in a single layer in the prepared baking dish. On top of each piece of chicken, layer 2 slices of ham followed by slices of the Swiss cheese. Try to make sure as much of the chicken is covered in cheese or ham. Sprinkle the prepared bread crumbs over the chicken pieces.
Bake for 30-35 minutes or until the chicken is fully cooked, the cheese is bubbling, and the bread crumbs are golden brown.
When the chicken is almost done, make the sauce. In a medium saucepan, melt 2 tablespoons butter. Once melted, whisk in the flour and cook, whisking constantly, for 1-2 minutes. Slowly pour in the milk while quickly whisking. Whisk in the bouillon granules, salt, and continue whisking over medium heat until the mixture begins to simmer and thicken, about 3-5 minutes. Once the sauce has bubbled and thickened, remove from heat and stir in the mustard, Worcestershire sauce, and Parmesan cheese. Stir until the cheese is melted.
Serve each chicken cordon bleu portion with warm sauce.
Source: Mel's Kitchen Cafe
Tuesday, January 5, 2016
Cheesy Sausage Tortellini
30 minutes, one pan, and super tasty! You're just 7 ingredients away from a new family favorite.
I adore quick and easy weeknight meals, but not if it's at the expense of flavor! After a long day of work, I rarely want to walk in the door and make an elaborate dinner - and I'm assuming you're the same, too! With very little hands on time needed, this dish is perfect for long days. Bonus: it was a huge hit! My husband, especially, loved it.
You simply brown sliced sausage, saute it in garlic for extra flavor, and then let it simmer with tomato sauce, cream, broth, and store bought tortellini. Once the pasta is cooked through, it's ready to serve!
It's creamy, cheesy, and smoky - what more do you need?
Cheesy Sausage Tortellini
2 tablespoons olive oil
1 lb smoked sausage, thinly sliced
2 cloves garlic, minced
3/4 cup chicken broth
1 cup tomato sauce
1/2 cup heavy cream
9 ounce package refrigerated or frozen cheese tortellini (no need to thaw)
salt and pepper, to taste
In a large skillet, heat the oil over medium-high heat. Once hot, add the sliced sausage (being careful to not overlap) and cook until well browned, about 3-4 minutes a side. Add the garlic and cook, stirring, until fragrant, about 30 seconds.
Add the broth, tomato sauce, heavy cream, and tortellini. Stir well and bring to a simmer. Cover, reduce heat to low, and let simmer for 12 minutes or until the pasta is tender and cooked through.
Serve hot.
Slightly adapted from Kevin and Amanda
Subscribe to:
Posts
(
Atom
)