Hosting a cooking camp for kids can be loads of fun - for the adults and the kids! But it does take careful planning and lots (lots!) of flexibility. Here is how I organized mine, and what I'd do differently!
This post has taken, oh, 8 months to write. I intended to share details about the cooking camp I hosted last summer but life got in the way. Now that I'm planning for round two, I thought I'd finally share how round one went :)
Some tips:
*
scroll down if you just want to see the recipes!
1. Choose a theme. It helps with menu selection, advertising, and I'm a sucker for themes. I went with cooking around the world. It was hard to narrow it down so I started with a list of about 12 countries and then pared it down as I fleshed out the menus. Most days, I also had themed paper goods to eat off of - just for more fun.

Things I learned: As soon as you release the menu, parents will tell you what their kids won't eat. Some will want to send alternative food. I can promise you that not a kid went hungry - and except for very rare occasions, they all tasted everything they made. First, kids behave differently without parents around and second, they have a huge amount of ownership over the food they created. They were darn proud of it and wanted to taste the final product! Don't change your plans, or figure out a way to feed a child something else. When you have a wide selection of things, they won't go hungry. Note: I asked the parents regarding food allergies as soon as they registered. Those would, obviously, merit a menu change.
2. Invest in some basic supplies. You really can't just bring all your stuff with you. For one, most of us don't own 15 pizza cutters. Part of working with kids means that they need to be BUSY or, as I like to say, they start to create their own fun. I was expecting 20 so I purchased enough for each child to have some things and for them to work in pairs for other things. Dollar Tree was GREAT for this as they carry a lot of staple items that actually work fairly well.
The short list of items I bought:
Thin plastic cutting boards
Paring knives
Pizza cutters (good for cutting herbs, tortillas, etc)
Measuring cup sets - 10
Wooden spoons
Pasta makers - 4
Electric single burners - 3
Mixing bowls - 4 sets
Ramekins - TONS!
I brought from home, and borrowed from other adults helping, big ticket items like baking sheets, stand mixer, food processor, pots and pans, and baking pans. Oh - and my favorite knife! While I would have rather not hauled stuff, I just threw it in a big rubbermaid bucket and brought it ahead of time. Saved a ton of money and I knew I could rely on it.
Things I learned: don't underestimate the amount of paper towels, wax paper, foil, and Lysol wipes you need. I had to make a run after the first day and stock up! Also don't forget you'll want some disposable storage containers for leftovers!
3. Have a fun activity or two for them to do, especially in the beginning. I bought canvas aprons for them to decorate with fabric markers in the beginning - they wore those all week but needed a good washing every night. Even with the best planning, there will be downtime as adults clean up, or set up for the next activity, and - as I mentioned above - if you don't suggest something for them to do, they'll create their own. We were so lucky to be hosting it in our children's building next door to the children's library so they hung out in there.
Things I learned: They almost need 2 aprons a day, and some of my older kids needed an adult sized apron to do any good. We made it work but this year I'm considering buying disposable aprons so if chicken juice gets on it, we can just change it out. The personalized ones are cute but they were pretty sad after a week of cooking.
4. Carefully plan the day. This is the hardest part. You have to choose recipes that all end up "done" at the same time, and don't underestimate how long it'll take a group of children to create. A couple recipes ended up scratched at the last minute but we (for the most part) stuck to the plan each day.
I literally wrote a play by play. It read like a script and had it broken down as to what needed to be done in what order. Took hours to write but SO worth it. I also could hand a copy to another helper and they could easily lead a group.
Because you're aiming for lunch, we had 2ish hours to do the main meal. Then you have dessert and usually a snack + fun recipe + clean-up.
Things I learned: There is a huge gap between a 6 year old and a 12 year old. Yes, I knew this beforehand but underestimated how bored a 12 year old would be waiting on a 6 year old to master a skill, or how frustrated a 6 year would be when they wouldn't be allowed to do a knife skill a 12 year old was doing. I learned that lesson on Monday and rewrote the entire rest of the week to be in 2 groups - younger and older. This year, I'm simply doing 2 camps because that was HARD work to balance.
5. Recruit a photographer - and don't ask them to help cook! Cameras + kids cooking don't mix well. My hands were coated in ingredients almost constantly, and so were every other adult in the room. By mid-week, I realized we were missing loads of great photos because we were too busy to snap them. Looking through the pics from last year to create this post made me realize we missed complete days!
Things I learned: This year, my intern will likely play photographer - and only photographer. So many of the parents were dying to see what their kids did and we had very little proof to show them!
6. Hit up the local chef store. You're buying most items in bulk anyways and the prices are much better than Costco or Sams. If you have access to a food supplier, take advantage of the lower prices and delivery!
Things I learned: I thought I'd just bring some of my own spices on days I needed them but reality was that my mind was already swimming and I often forgot them at home. While it saves some money to take a few tablespoons from your own collection, it's only helpful if you remember. Most spices are only a couple bucks. Just buy them when you do your big shopping trip!
7. Plan some non-food recipes. This wasn't originally part of my plan but I soon found that in order for things to be timed well, and for the kids to stay occupied, there comes a point when you simply can't make another thing to eat. Cooking isn't just for food! We made things like playdough and bouncy balls that they took home. Simple, and usually calls for ingredients you already bought.
Things I learned: Since I added this at the last minute, I didn't have much time to research items nor did I get to test them in advance. This summer, I'll have lots of these recipes "in my back pocket" ready to pull out if we need a time filler.
8. Send them home with a cookbook! My amazing intern took the pics we snapped, plus the recipes, and compiled them into a fantastic full color cookbook that they went home with on Friday. I'm not sure how she had the energy to work on it each night but it was amazing! The parents, especially, were so appreciative that they had the recipes for all the things we made (that their kids actually ate!).
Things I learned: We'll plan ahead this year! Recipes and the general layout can be done ahead of time so photos can just be popped in. We will probably outsource the printing of it, too, as it was a big headache to print/bind while trying to teach the class.
9. Don't miss the basics. While some of your kids may have helped in the kitchen, don't assume that they all did. Adults take for granted that they know certain things - like washing hands constantly, holding a knife correctly when walking across the room, not handling raw chicken alongside other ingredients, reading the entire recipe prior to cooking, etc. I'm not much on rattling off rules so we went over a few safety tips first then added more along the way. Handwashing, of course, was the biggest one. If I saw a kid wipe their nose I sent them straight to the sink. They soon learned to pay more attention to where their hands were.
Things I learned: By dictating much of the cooking, they weren't reading recipes as much as they would if making just 1 item. Mid-week, I spent some time on reading a recipe and put them to a challenge. I assigned a leader (ie: older child) for a group of 4 and they had to make an entire recipe without ANY adult help. The results were quite amusing! This year, we'll spend even more time on following a recipe.
More things I'll do different this year:
1. Have more of a back up plan. For example, we didn't make near enough (homemade) pasta for that many people and had none on hand to boil. Things go wrong - and kids are hungry!
2. Split the age groups up (see #4)
3. Have a smaller group! While you can herd a large group, the bigger it gets, the less hands on they are able to be (and more likelihood of behavioral issues). I'm capping it at 10 participants for each camp this year. Last year I had 23!
4. Recruit more adult volunteers. I've done cooking for groups before but never this extensive. I greatly underestimated how many hands there are needed. Thankfully, some fantastic teenagers heard my calls and came running.
5. Cut it to 4 days. By Friday, we were DONE. The kids weren't, of course, but it kills you and your volunteers. Plus the clean-up effort - even if you clean daily - is ridiculous and time consuming.
6. Now that I have a basic collection of supplies, I'll be adding more items to it this year like some of those "big ticket"items above. Within a couple of years, I should have a well stocked selection.
-----------------------------------------------------------
Okay, okay. I'll get to what we actually made!
Day 1: Italy
Homemade bowtie pasta with sage butter sauce
Cheesy garlic bread
Salad with Buttermilk Ranch Dressing
Cannoli Cups
4 tablespoons butter
8 sage leaves
½ lemon, juiced
¼ cup grated Parmesan cheese
Melt 4 tablespoons butter in a saucepan until it’s lightly browned. Add sage leaves and remove from heat. Add lemon juice. Immediately before serving, toss in the cheese.
1 (12-inch) loaf Italian bread
4 cloves garlic, peeled
1 stick salted butter, softened
1/4 cup freshly chopped basil leaves
1/4 cup chopped flat-leaf parsley
1/4 cup grated Parmesan
1/4 cup grated mozzarella
Kosher salt and freshly cracked black pepper
Preheat the oven to 350 degrees F.
Slice the bread in half, lengthwise.
Add the garlic, herbs, butter, and Parmesan to the bowl of a food processor and pulse until well incorporated.
Spread the butter mixture down the inner length of both slices of the bread and place on sheet tray. Bake until the bread crisps up and the cheese melts, about 10 minutes. Sprinkle the slices with the mozzarella cheese and season with salt and pepper, to taste. Slide the bread back into oven until the cheese bubbles, about 5 minutes. Remove the bread from the oven and slice into pieces.
Buttermilk Ranch Dressing {
source}
¾ cup mayonnaise
¾ cup sour cream
¼ to ½ cup buttermilk
1 tablespoon lemon juice
1 tablespoon olive oil
1 tablespoon minced fresh parsley
1 tablespoon minced fresh chives
1 small garlic clove
½ teaspoon salt
¼ teaspoon ground black pepper
Add all ingredients with ¼ cup of the buttermilk to a blender or food processor. Puree for about 10 seconds to combine. Check the consistency and add additional buttermilk a couple tablespoons at a time if you desire a thinner dressing. Refrigerate.


For the filling:
1 container (15 oz) whole-milk ricotta cheese
½ cup powdered sugar
2 tablespoons granulated sugar
½ teaspoon vanilla
For the cups:
1 box refrigerated pie crusts, softened as directed on box
3 tablespoons sugar
1 teaspoon ground cinnamon
To garnish
¼ cup miniature semisweet chocolate chips
Additional powdered sugar
In large bowl, beat all filling ingredients with electric mixer on medium speed until creamy. Place filling in 1-gallon resealable food-storage plastic bag; refrigerate while making cups.
Heat oven to 425°F. On lightly floured work surface, unroll pie crusts. Sprinkle each crust with sugar and cinnamon. Lightly roll rolling pin over sugar and cinnamon to press into pastry. With 2 1/2- to 3-inch round cutter, cut out pastry rounds. Lightly press each pastry round into ungreased mini muffin cup.
Bake about 10 minutes or until pastry cups are golden brown. Cool completely in pans, about 15 minutes.
Just before serving, remove filling from refrigerator. Cut 1 bottom corner off bag; pipe filling into cooled pastry cups. Sprinkle with chocolate chips and powdered sugar. Serve immediately.
Day 2: All American
Lemon Butter Burgers
Oven Baked Fries
Homemade Ketchup
Homemade Honey Mustard
Strawberry Shortcake Ice Cream Sandwiches
Sparkling Lemonade
6 tablespoons butter, room temp
1 tablespoon finely chopped fresh tarragon
1 tablespoon finely chopped fresh basil
1 tablespoon finely chopped fresh Italian parsley
1 teaspoon fresh Meyer lemon juice or regular lemon juice
1 teaspoon finely grated Meyer lemon peel or regular lemon peel
1.5 pounds ground beef (preferably 15%)
Hamburger buns
Toppings: sliced cheese, lettuce, tomato, pickles, etc.
In a small bowl, mix together the butter, all the herbs, lemon peel, and lemon juice until well combined. Season with salt and pepper. Measure out 1/3 cup butter and transfer it to a sheet of plastic wrap. Using the plastic wrap as aid, form the butter into a 3 inch log. Wrap to seal and place in the fridge until firm (if making this at the same time as the burgers, put it in the freezer for 30 minutes).
Divide the meat into 4 equal parts. Form each piece into a ball and, using your thumb, make a deep wide indentation in the center of each ball.
Slice the butter into 4 pieces and flatten them slightly. Press a butter piece into the indentation on each patty and seal the meat around the butter, completely enclosing it.
Preheat the grill to medium-high heat and oil the grates. Sprinkle both sides of the burgers with salt and pepper and grill until cooked through, 4-6 minutes per side. Spread the remaining butter on the cut sides of the buns and grill the buns until slightly charred, about 1 minute per side.

Oven Baked Fries {
source}
6 or 7 Idaho potatoes, 1/3-inch-thick French fry-style strips, soaked in cold water (to avoid browning)
4 tablespoons extra-virgin olive oil
4 tablespoons salted butter, cut cubes
Coarse salt and freshly ground black pepper
Preheat the oven to 400 degrees.
Drain the potatoes and pat dry with paper towels. Spread 1 tablespoon of the olive oil on each of 2 rimmed baking sheets and spread out the potatoes. Overlapping is fine.
Drizzle the remaining 2 tablespoons of olive oil over the cheese. Scatter the cubed butter around the pans.
Bake until the potatoes are golden brown, rotating the pans after 30 minutes, for 45 to 50 minutes total. Use a spatula to lift off the potatoes. Sprinkle with salt and pepper to taste. Serve hot.
Homemade Ketchup {
source}
6 oz can tomato paste
1/4 cup honey
1/2 cup white vinegar
1/4 cup water
1 tsp sugar
3/4 tsp salt
1/4 tsp onion powder
1/8 tsp garlic powder
Combine all ingredients in a saucepan over medium heat and whisk until smooth. When it comes to a boil, reduce heat to low and simmer 20 minutes, stirring often. Remove from heat and let cool.
Homemade Honey Mustard {
source}
1 cup mayo
4 tablespoons mustard
2 tablespoons lemon juice
4 tablespoons honey
Whisk together all ingredients. Cover and refrigerate until ready to serve.
Strawberry Shortcake Ice Cream Sandwiches {
source}
1 pint vanilla ice cream
1.5 cups strawberries, washed, hulled, and cubed
1 frozen pound cake
Place the ice cream in to a large bowl to soften.
Stir the cubed strawberries into the softened ice cream until combined. Transfer the bowl to the freezer to firm up slightly.
Slice the pound cake into thin slices. Place them on a cookie sheet and leave them in the freezer until ready to use.
Use a spatula to spread ice cream on slices and make sandwiches. Transfer back to the freezer to firm completely.
3/4 cup sugar
1/2 cup water
1/4 cup lemon peel strips (about 1-1/2 lemons)
3/4 cup lemon juice (about 3 lemons)
1 cup club soda
In a small saucepan, heat sugar and water over medium heat until sugar is dissolved, stirring frequently. Stir in lemon strips. Bring to a boil. Reduce heat; simmer, uncovered, for 5 minutes. Cool slightly.
Transfer to a pitcher. Stir in lemon juice; cover and refrigerate until chilled. Discard lemon strips. Stir in club soda and serve over ice.
Day 3: China
Pork Potstickers
Sweet and Sour Chicken
Chow Mein
Chinese Snack Mix
Chow Mein Cookies
25-30 wonton or potsticker wrappers
1 1/2 tablespoons oil
1/2 cup water
For the filling:
12 oz. ground pork
1/2 cup thinly sliced cabbage
1 1/2 tsp. grated fresh ginger
1 tsp. sherry
1/2 tsp. sesame oil
1/2 tsp. salt
Pinch of pepper
Combine all filling ingredients together in a bowl. Chill the filling in the refrigerator for 30 minutes.
Once filling has been chilled, assemble the potstickers:
Place 1 heaping teaspoonful of the filling into the center of the wrapper. Dip your finger into a small bowl of water and moisten the edges of the wrapper all of the way around. Fold the potsticker in half and press and seal the edges together.
Once all potstickers are assembled, heat the oil in a skillet over medium heat. Add enough potstickers to fill but not crowd the skillet. Fry the potstickers until the bottoms turn golden brown and crispy.
Add the water and cover the skillet with a lid. The water will sizzle and steam the potstickers. Cook until all of the water has completely evaporated (approximately 3-5 minutes). Serve immediately.
Sweet and Sour Chicken {
source}
3-4 boneless, skinless chicken breasts
Salt and pepper to taste
1½ cup cornstarch
3 eggs, beaten
¼ cup canola oil
1 cup granulated sugar
4 tablespoons ketchup
¼ cup white vinegar
¼ cup apple cider vinegar
1 tablespoon low sodium soy sauce
1 teaspoon garlic salt
Preheat oven to 325 degrees. Cut chicken breasts into bite-sized pieces and season with salt and pepper.
In separate bowls, place cornstarch and slightly beaten eggs. Dip chicken into cornstarch then coat in egg mixture.
Heat canola oil in a large skillet over medium-high heat and cook chicken until browned. Place the chicken in a 9 x 13 greased baking dish.
In a medium sized mixing bowl, combine sugar, ketchup, apple cider vinegar, white vinegar, soy sauce, and garlic salt. Pour over chicken and bake for 1 hour, stirring occasionally.

1/4 cup soy sauce
1 tablespoon brown sugar
2 cloves garlic, grated
1 teaspoon fresh ginger, grated
black pepper, to taste
2 tablespoon vegetable oil
~15 ounce package Yakisoba stir-fry noodles
2/3 cup celery, chopped
1/2 medium onion, thinly sliced
2 heaping cups cabbage, chopped
In a small bowl, combine the soy sauce, brown sugar, garlic, ginger, and black pepper. Set aside.
Remove noodles from package and discard the included flavoring packets. Rinse noodles well, drain, and set aside.
Heat oil in a large wok. Add celery and onion and saute until the onions are soft and transparent. Add the cabbage and saute another few minutes until soft. Add noodles and soy sauce mixture and heat for an additional 2-3 minutes or until the noodles are heated through.
Serve immediately.

3 cups Rice Chex
3 cups dried snap peas
2 cups crunchy chow mein noodles
1 1/2 cups roasted and salted peanuts
1 1/2 cups sesame sticks
4 tablespoons butter, melted
2 tablespoons soy sauce
2 tablespoons light brown sugar
1 tablespoon rice wine vinegar
2 cloves garlic, finely grated
1/2 teaspoon Chinese five-spice
Kosher salt
Preheat the oven to 350 degrees F. Toss the rice chex, snap peas, chow mein noodles, peanuts, and sesame sticks together in a large bowl. Whisk the butter, soy sauce, brown sugar, vinegar, garlic, five-spice, and 1/2 teaspoon salt in a separate bowl. Pour the sauce over the snack mix and toss to coat well. Spread out on a rimmed baking sheet and bake until the mix is toasted and almost completely dry, 16 to 18 minutes, tossing about halfway through.
Let cool completely, and then store in an airtight container.
Chow Mein Cookies
1 small bag butterscotch chips
1 small bag chocolate chips
5 ounce can chow mein noodles
Combine both bags of chips and heat on high in microwave bowl about 2-3 minutes. Just long enough to melt. Add noodles and mix well. Drop spoonfuls onto wax paper. Let cool.
Day 4: Mexico
Salsa
Kid Friendly Guacamole
Queso
Homemade Tortilla Chips
Chicken Taquitos
Tres Leches Cake
½ cup diced onion
2 14.5 ounce cans diced tomatoes with chiles
2 14.5 ounce cans whole tomatoes
1 teaspoon garlic salt
1.5 teaspoon ground cumin
½ teaspoon sugar
2 teaspoons cilantro
Lime juice
Place the onions in a food processor. Process for just a few seconds. Add both kinds of tomatoes, the garlic salt, cumin, sugar, cilantro, and a squeeze of lime. Process until everything is well blended, but do not puree. Place in a container, cover, and chill well before serving.
Kid Friendly Guacamole
2 avocados
1 tablespoon lime juice
½ teaspoon salt
Mash together until well combined.
2 cups Milk
2 pounds White American Cheese
4 tablespoons Butter
1 can green chiles, diced
4 teaspoons cumin
4 teaspoons garlic powder
Place cheese, milk, and butter in a sauce pan over low heat. Heat until melted - stirring frequently.
Stir in the green chiles, cumin, and garlic powder. Add more milk if needed.
Homemade Tortilla Chips
Corn tortillas
Vegetable oil
Salt
Preheat oven to 350°F. Pour a few tablespoons of oil into a bowl and brush a thin coating onto your baking trays. Set aside.
Place one tortilla on the cutting board and brush the top with a light layer of oil. Place another tortilla on top of the oiled one and brush the top with oil. Continue in this manner until all your tortillas are oiled and stacked in one pile.
Cut into wedges: Using a large, sharp knife, cut your tortilla stack in half using one firm chop, if possible. Cut one of the halves in half and cut each of those halves in half again, forming wedges.
Arrange the tortilla wedges in a single layer on the oiled trays. Sprinkle a pinch or two of flaked sea salt over the tops, being sure that all of the wedges get a touch of salt.
Place trays in the oven and bake for 8 - 12 minutes. Check your chips at 8 minutes and rotate your pans. Be aware that very thin tortillas are vulnerable to your oven's hot spots and can start to char.
The chips are done when the edges are crisp and dry and slightly lifted from the tray. They should be a few shades darker, though not completely browned.

3 oz. cream cheese, softened
¼ cup salsa
1 tbsp. freshly squeezed lime juice
1 tsp. chili powder
½ tsp. cumin
½ tsp. onion powder
2 cloves garlic, minced
3 tbsp. chopped cilantro
1-2 green onions, chopped
2 cups shredded cooked chicken
1 cup shredded cheese
10-12 6-inch flour tortillas
Cooking spray
Kosher salt
Preheat the oven to 425˚ F. Line a baking sheet with a silicone mat or parchment paper, or spray lightly with cooking spray.
In a large mixing bowl, combine the cream cheese, salsa, lime juice, spices, cilantro, chicken, and shredded cheese. Mix thoroughly until well combined.
Briefly heat the tortillas in the microwave to make them soft enough to roll easily, about 20-30 seconds. Place a tortilla on a work surface. Spoon 2-3 tablespoons of the filling mixture down the middle of the tortilla. Roll the tortilla up tightly around the filling. Place seam-side down on a baking sheet. Repeat with the remaining tortillas and filling, spacing the assembled taquitos evenly on the baking sheet. Spray the tops lightly with cooking spray and sprinkle with a pinch of kosher salt.
Bake 15-20 minutes, until crisp and golden brown.

2 cups flour
3 teaspoons baking powder
Salt
10 eggs
2 cups sugar
2 teaspoons vanilla
1 cup milk
2 cans evaporated milk
2 cans sweet condensed milk
½ cup heavy cream
2 pints heavy cream
Maraschino cherries
Preheat oven to 350. Liberally spray a 9x13 inch pan until well coated. Set aside.
Combine the flour, baking powder, and salt in a large bowl.
Separate the eggs.
Beat the egg yolks with 3/4 cup sugar on high speed until the yolks are pale yellow. Stir in the milk and vanilla. Pour this mixture over the flour mixture and stir very gently until combined.
Beat the egg whites on high speed until soft peaks form. With the mixer on, pour in the remaining 1/4 cup sugar and beat until egg whites are stiff but not dry.
Fold the egg white mixture into the batter very gently until just combined.
Pour into the prepared pan and spread to even out. Bake for 35-45 minutes or until a toothpick comes out clean.
Turn the cake out onto a rimmed platter and allow to cool.
In a small pitcher, combine the condensed milk, evaporated milk, and heavy cream. Once the cake is cool, pierce the surface with a fork several times. Slowly drizzle all but about 1 cup of the milk mixture, working to get it around the edges are much as you can. Allow the cake to absorb for 30 minutes.
To ice, whip 1 pint of very cold heavy cream with 3 tablespoons of sugar until thick and spreadable. Spread over the surface of the cake, cut into pieces, and serve each piece with a maraschino cherry.
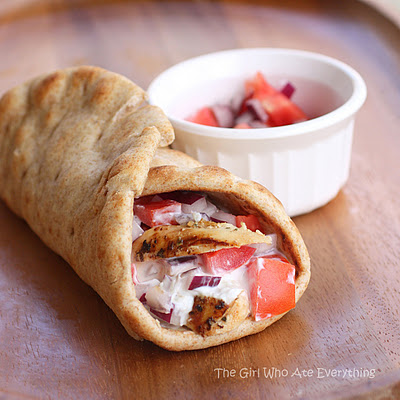
Day 5: Greece
Hummus
Homemade Pita Chips
Chicken Gyros
Greek Salad
Baklava
Hummus
2 cans chickpeas
1/2 cup lemon juice
1/2 cup tahini
1 large garlic cloves, minced
EVOO
1.5 teaspoons kosher salt
1 teaspoon cumin
In the bowl of a food processor, combine tahini and lemon juice. Process for 1 minute. Scrape sides and bottom of bowl then turn on and process for 30 seconds. Add the olive oil, minced garlic, cumin, and the salt to the whipped tahini and lemon juice. Process for 30 seconds, scrape sides and bottom of bowl then process another 30 seconds.
Open the cans of chickpeas, drain liquid, then rinse well with water. Add half of the chickpeas to the food processor then process for 1 minute. Scrape sides and bottom of bowl, add remaining chickpeas and process for 1 to 2 minutes or until thick and quite smooth.
Add more water if needed and swirl EVOO over top before serving.
Homemade Pita Chips
Pita bread
Oil
Salt
Preheat the oven to 375 degrees F.
Cut each pita bread in quarters and each quarter in half to make 8 triangles. Place them in a single layer on a sheet pan and sprinkle lightly with olive oil, salt and pepper. Bake for about 10 minutes, until crisp, turning once.
1 cup plain Greek yogurt
1 regular cucumber, peeled and seeded
1 teaspoon minced garlic
1 teaspoon white wine vinegar
Salt and pepper
Squeeze of fresh lemon juice
Extra virgin olive oil
For the chicken:
2 teaspoons minced garlic
Juice of 1 lemon (2-3 Tablespoons)
2 teaspoons red wine vinegar
2 Tablespoons extra virgin olive oil
2 heaping Tablespoons plain Greek yogurt
1 Tablespoon dried oregano
Salt and pepper
1 1/4 lbs. boneless, skinless chicken breasts
To assemble:
Pita bread
Fresh tomatoes, seeded and diced
Red onion, sliced thin
Shred the cucumber or chop in food processor. Wrap in a towel a squeeze to remove as much water as possible. Mix together the yogurt, shredded cucumber, garlic, white wine vinegar, salt and pepper to taste, and lemon juice. Drizzle lightly with olive oil. Refrigerate for at least 30 minutes before serving to allow the flavors to meld.
To prepare the chicken, combine the garlic, lemon juice, red wine vinegar, olive oil, yogurt, oregano, and salt and pepper to taste in a medium bowl. Whisk together until mixed well. Add the chicken pieces to the bowl and mix well to coat. Cover and refrigerate for about 1 hour.
Cook the chicken as desired, either in the skillet or with the broiler. Once the chicken is completely cooked through, transfer to a plate and let rest for 5 minutes. Cut into strips.
Heat pitas. Top with chicken, tzatziki sauce, diced tomatoes, and sliced onions. Serve immediately.
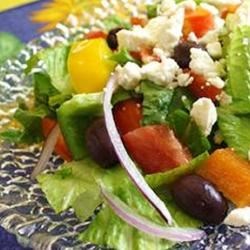
Salad mix
Feta Cheese
Kalamata olives
10 tablespoons EVOO
2 tablespoons red wine vinegar
2 teaspoons oregano
2 lemons, juice
Whisk together the olive oil, oregano, lemon juice, red wine vinegar, and black pepper. Pour dressing over salad, toss and serve.

1 pound chopped pecans
1 teaspoon cinnamon
1 package phyllo dough
1 cup butter, melted
1 cup sugar
½ cup honey
1 teaspoon vanilla
1 teaspoon grated lemon peel
Preheat oven to 350 degrees. Lightly spray a 9x13 inch baking dish.
Toss together cinnamon and nuts. Unroll phyllo and cut whole stack in half to fit the dish. Cover phyllo with a damp cloth while assembling the baklava, to keep it from drying out.
Place two sheets of phyllo in the bottom of the prepared dish. Brush generously with butter. Sprinkle 2 to 3 tablespoons pecans on top. Repeat layers until all ingredients are used, ending with about 6 sheets of phyllo. Using a sharp knife, cut baklava (all the way through to the bottom of the dish) into four long rows, then (nine times) diagonally to make 36 diamond shapes.
Bake in preheated oven 50 minutes, until golden and crisp.
While baklava is baking, combine sugar and water in a small saucepan over medium heat and bring to a boil. Stir in honey, vanilla and lemon zest, reduce heat and simmer 20 minutes.
Remove the baklava from the oven and immediately spoon the syrup over it. Let cool completely before serving. Store uncovered.
--------------------------------------------------
I hope this is helpful to anyone wanting to host a cooking event for kids. My biggest take-away is to never underestimate their abilities. They can do so much in the kitchen - and do it well!