Tuesday, April 30, 2013

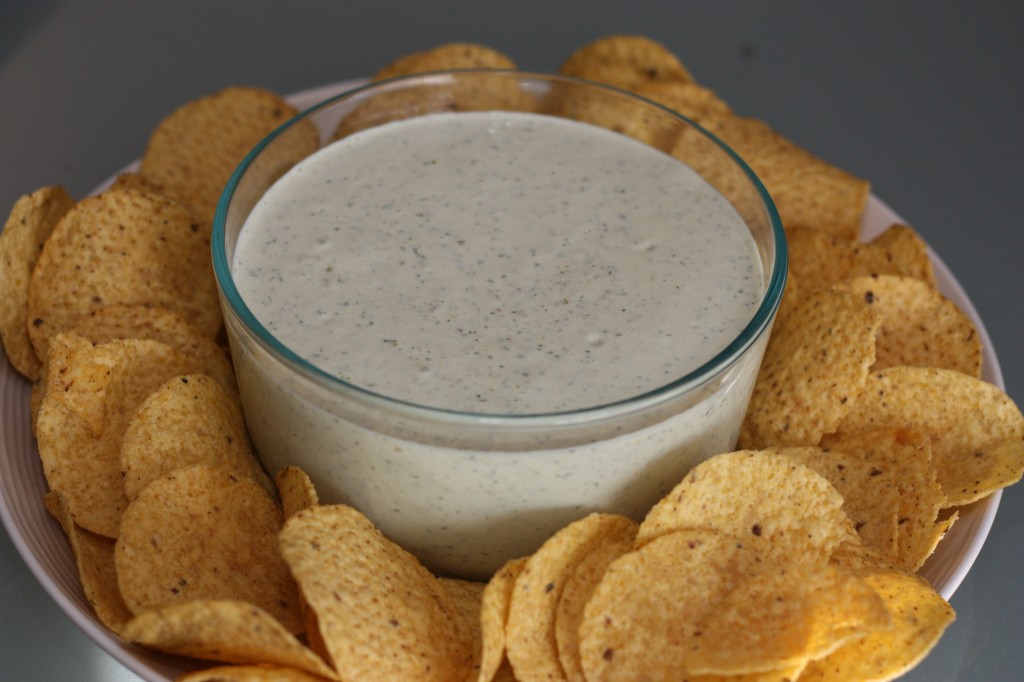
Creamy Avocado Ranch Dressing


Okay, y'all. You know how some dressings are so good you just want to push aside the lettuce and drink the dressing?

Yeah, this is one of those.


I've made oil based vinaigrette's before but have never made a homemade creamy dressing that didn't call for a packet of something. It's sorta unfortunate that I've now discovered how easy it is... {see above re: drinking}

Spring = grill season
Grill season = grilled chicken
Grilled chicken = grilled chicken salads

And so this dressing made an appearance at our house, to accompany our easy peasy grilled chicken salads.

{we're so glad it came!}

Over salad, to dip veggies (or fries!) in, by the spoonful, by the jarful, it's all good.


Creamy Avocado Ranch Dressing
1/2 avocado, roughly chopped
1/3 cup mayonnaise
1/3 cup sour cream or greek yogurt
2 tsp. olive oil
2 tsp. lemon juice
1 small bunch chives, coarsely chopped
2 tbsp. fresh parsley
1 clove garlic, minced
Up to 1/2 cup buttermilk
Kosher salt and fresh ground pepper, to taste

Combine all ingredients in a blender or food processor starting with 1/4 cup of the buttermilk. Blend for 10 seconds. Check consistency and taste and blend in additional buttermilk if desired. Season with salt and pepper to taste. Store in an airtight container in the fridge.

Source Annie's Eats


Friday, April 26, 2013

Barbeque Salmon


Have you noticed that grilling is implied to be a man's job? Why is that? At it's very root, it's simply a kitchen appliance that sits outside instead of inside. Even growing up, my dad did all the grilling and if you believe the Father's Day advertisements, that's the case with all families.

Well in our family, that isn't the case. We split mealtime responsibilities pretty evenly. I cook, he cleans. That doesn't mean we don't help each other out occasionally but more times than not, it works perfectly for us. So when I choose a grilled meal, I grill it.

Which means... I'm a total grill cheerleader. Odd? Perhaps, but I really do think people don't utilize it near enough. It's not only easy, but it keeps your kitchen cool in the hot months and leaves you with very few dirty dishes. And the results are awesome!

Have you dusted off your grill yet? If you're on the hunt for something new to throw on the grill this spring, try this delicious and simple fish recipe. It uses ingredients you likely already have in your pantry, cooks up fast, and is low calorie. The salmon ends up with a caramelized sweet and spicy crust that is perfect served alongside grilled vegetables or over a salad.

{I've also included oven instructions if you don't have access to a grill}


Barbeque Salmon
1/4 cup pineapple juice
2 tablespoons fresh lemon juice
4 (6-ounce) salmon fillets
2 tablespoons brown sugar
4 teaspoons chili powder
2 teaspoons grated lemon zest
3/4 teaspoon ground cumin
1/2 teaspoon salt
1/4 teaspoon ground cinnamon
Cooking spray

Combine pineapple juice, lemon juice, and salmon in a zip-top plastic bag; seal and marinate in refrigerator 1 hour, turning occasionally.

Preheat grill for medium heat.

Remove fish from bad and discard marinade. Combine the sugar, chili powder, lemon zest, cumin, salt, and cinnamon in a small bowl. Rub over fish.

Lightly oil the grill grate. Place salmon on the grill, cover, and cook 6-8 minutes per side until the fish flakes easily with a fork.

Optional oven method: Preheat oven to 400°. After applying the rub, place the fish in an glass or ceramic baking dish coated with cooking spray. Bake for 12 minutes or until fish flakes easily with a fork.

Source: adapted from What's Cookin, Chicago?, originally from Cooking Light (includes nutritional info)

Wednesday, April 24, 2013

Strawberry Lemonade


Aimee + HTML = frustration city! I've been trying to add some things to my humble little blog which means... dealing with HTML. I'm no good at it, but after a few hours of trial and error I did successfully add a few things:

1. Pinterest is where it's at so now when you hover over a picture, the "pin" button appears. I *love* when people pin my stuff so please, pin away! Hopefully this will make it super easy for you! {psst - follow me? Click the "P" on the right sidebar! I'd love to follow you, too, so add your link to in the comment box!}

2. I also added a Facebook "share" button at the top of each post so you can share a favorite recipe or post with your Facebook friends {and easily find it later!}. Posts are also shared on my Facebook page - which makes sharing even easier - so join me there! Just click the "F" on the right sidebar.

3. As you know, Google Reader is going away soon... which leaves most of us searching for a new way to keep up with our favorite blogs! I jumped on the Bloglovin' bandwagon and so far, really love it! It easily transferred all my subscriptions so I didn't lose any of my favorite blogs in the move and the layout is easy to navigate. Click on the bloglovin' picture in the right sidebar to follow me there!

Psst - if you're awesome at HTML, I'm completely and utterly impressed. Truly.

And now to a recipe!

Spring has sprung here in North Carolina! This is our first spring here and so far, I'm in love. And I can even overlook the layer of green pollen all over everything in exchange for the flowers, trees, and lovely temperatures.

For me, spring = lemonade! While Jason digs lemonade on it's own, I strongly prefer strawberry lemonade especially when made from scratch. This strawberry lemonade? Amazing. Lemonade doesn't need to come from a can; you can whip this up in minutes and it tastes so much better. Plus, people will be super impressed :)

The final product is truly your preference and by making it from scratch, you can easily tweak it. Some people like lots of pucker, others like it sweeter. These measurements are definitely our preference and you should taste and adjust as you go.

Isn't it such a lovely spring shade of pink?


Strawberry Lemonade
2 cups lemon juice (fresh is best, but bottled is okay!)
3 cups sugar
2 cups fresh strawberries
15 cups water, divided

In a medium saucepan, make simple syrup by bringing 3 cups sugar and 3 cups water to a boil, stirring, until the sugar has dissolved. Remove from heat and allow to cool.

Once the simple syrup has cooled, puree the strawberries in a blender or food processor. If you don't like the seeds included, when you finish send the puree through a cheesecloth to remove them (I didn't bother and we didn't mind them at all).

In a large pitcher, mix together the lemon juice and 2 cups of the simple syrup. Stir in the strawberry puree and remaining 12 cups of water. Mix well. Taste and add more simple syrup or lemon juice if needed. Serve over ice and enjoy!

Yields: 1 Gallon

Source: Adapted from Craftaholics Anonymous

Monday, April 22, 2013

Creamy Lemon Shrimp Pasta


Sometimes you just need a big bowl of pasta, am I right? There is something so comforting about noodles in any form. After the events of last week, I think today is a great day for a big bowl of comfort and a new beginning. Comforting doesn't mean long and tedious - matter of fact, this big bowl of comfort can be on your table in 15 minutes.

Did she say 15 minutes?!

Oh yes. Yes, I did. 15, start to finish.

{I'm pretty sure I sat in the drive through at Mickey D's longer than that last week}

It's creamy. It's lemony. It's tasty. It's shrimp-y. Okay, that last one didn't work as well. It's good, okay? And way better than the Mickey D's drive through.

Join me for some pasta?

 
Creamy Lemon Shrimp Pasta

1 pound angel hair pasta
¾ cup heavy whipping cream
½ cup chicken stock
¼ cup lemon juice
Salt and black pepper
1 pound raw medium shrimp, peeled and deveined
¼ cup chopped parsley
zest of lemon
½ cup freshly grated parmesan cheese
Bring a large pot of salted water to a boil. Add the angel hair pasta to the boiling water. Cook per package instructions.

In a sauté pan, heat the cream, chicken stock, and lemon juice to a low simmer. Simmer gently for 5 minutes. Add the shrimp to the simmering sauce. Stir well and add a pinch of salt and black pepper. Cook for another 4-5 minutes, or until the shrimp is cooked through.

Add the parsley to the sauce and let cook about 1 minute. Add the lemon zest and most of the parmesan and stir until melted. Drain the angel hair and add to the sauce. Toss well, then serve each portion with a sprinkling of the remaining parmesan.

Source: So Tasty, So Yummy

Saturday, April 20, 2013

Snickerdoodle Muffins (Surprise Recipe Swap)


Today, I'm so excited to be sharing the first recipe I've tried in an official recipe swap! I've never done one before - though I have NO idea why because it was super fun - and this month, I finally took the plunge and joined one. The premise is simple; you're assigned another participants blog to choose a recipe from, make, and post. Which means one of my recipes will be featured today, too, on someone's blog and I can't wait to find out who and what they thought about it!

I was assigned Susie over at Earning My Cape and I decided to try her Snickerdoodle Mini Muffins because really, who doesn't love all things snickerdoodle? I evidently don't own a mini muffin pan so I just used a regular muffin pan and it still worked great!

These muffins are just sweet enough but not so sweet your teeth hurt. They are buttery, soft, and exta delicious when warm! I had these in the oven in 5 minutes flat which makes it an even bigger hit :)

If you're interested in joining a recipe swap, go here and check out the details!

Susie, thank you for the delicious recipe!


Snickerdoodle Muffins
2 cups all-purpose flour
3 tsp baking powder
1/2 tsp salt
1/2 cup white sugar
1 egg
1 cup milk
1/4 cup melted butter
1 tsp vanilla extract
1 tsp cinnamon
2 TB white sugar

Preheat oven to 425 degrees. Line or butter muffin tin.

In a large bowl, stir together the flour, baking powder, salt, and 1/2 cup sugar. In a small bowl, combine the egg, milk, melted butter, and vanilla.

Add the milk mixture to the flour mixture and mix quickly and lightly until combined. Do not beat. The batter will be slightly lumpy.

Spoon the batter into the muffin tin, filling to the top. Combine the cinnamon and 2 tablespoons sugar and sprinkle over the tops of the batter.

Place in oven and turn the heat down to 400 degrees.

Bake at 400 degrees for 10-15 minutes, or until a toothpick comes out clean. My regular size muffins took around 14 minutes. Remove and enjoy!

Source: Earning My Cape

Thursday, April 18, 2013

Blackened Chicken and Cilantro-Lime Quinoa


I should have named the blog See Aimee Cook 30 Minute Meals.

I would have named it simply 30 Minute Meals but some girl named Rachael called dibs on it first.

Good food, made with with real ingredients, don't have to be complicated or take long. It can, and I do dabble in more complicated meals occasionally, but what I really want is for people to have access to easy, quick, delicious meals that mostly use ingredients found on the outside edge of your grocery store. This is one of those meals.

In the spring/summer/fall, the grill can be your best friend at the end of the day. Not only do you keep the heat outside but things on the grill are typically healthier and you don't have a big mess in your kitchen! This meal doesn't even call for marinating ahead of time so no worries if you are (like me) and thawing your chicken while you're at work. You can walk in the door, season the chicken, crank up the grill, start the quinoa, and have dinner done in LESS than 30 minutes. And it's so, so tasty - we both LOVED it!

Psst - The original recipe uses the stovetop but if the weather is nice, throw it on the grill instead and save that pan from being washed. I've included instructions for both methods.

Psst Psst - With the cayenne amount below, I did not find this spicy. However, you can adjust the amount based on your taste. The avocado cream sauce - if you decide to make it - will also help cut the heat if you're extra sensitive.


Blackened Chicken and Cilantro-Lime Quinoa
4 boneless skinless chicken breasts
1 teaspoon paprika
1/2 teaspoon salt
1/2 teaspoon pepper
1/4 teaspoon cayenne pepper
1/2 teaspoon onion powder
1/2 teaspoon cumin
2 teaspoon olive oil
2 cups low sodium chicken stock
1 cup quinoa
1 lime, juice and zest
salt and pepper
2 tablespoons cilantro, chopped
Avocado cream sauce, optional (see below)

Combine the first six ingredients in a small bowl. Mix well, then season both sides of each chicken breast.
Add the teaspoon of olive oil to a large pan or skillet. Heat the olive oil for a minute over medium/high heat. Add the chicken breasts to the pan. Cook for seven minutes on each side with the lid on.**
Add the chicken stock and quinoa to a medium saucepan. Bring to a simmer over medium/low heat. Reduce the heat to low and simmer for ten to fifteen minutes with the lid on, until all the stock has been absorbed.
After the chicken breasts have fully cooked, remove them from the pan and let them rest for seven minutes before slicing them.
In a large bowl, toss together the warm quinoa, lime zest, lime juice, chopped cilantro, and salt and pepper to taste.
Serve the sliced chicken breast on top of the quinoa with the optional Avocado Cream Sauce.
**If using the grill instead, skip this step and instead grill the chicken on medium heat until the chicken is cooked through and the juices run clear, about seven minutes per side
Avocado Cream Sauce - in a food processor, puree one avocado and two tablespoons of Greek yogurt until smooth.
Source: Slightly adapted from Sarcastic Cooking

Tuesday, April 16, 2013

SweetFire Chicken (Panda Express Copycat)

Near our home in Texas was a Panda Express. About 2 miles away, I would guess.

{though I'm really, really bad at guesstimating so take that as a grain of salt}

I'm uber picky about meat when dining out but I found the quality of the SweetFire Chicken to always be good quality. AND it was delicious - sweet, with a kick of heat. We dined there fairly often.

Panda Express does exist here in the great city of Charlotte but I don't eat there much (read: ONCE since we moved here last June). Why, you ask? For one, location. I don't find myself near one all that often. The bigger reason? Charlotte locations don't carry the amazing flavored tea that they have at every single Texas location.

{and by every single Texas location I really mean the 4 I've been to}

Since I'm not getting much Panda Express these days, I needed a SweetFire Chicken fix. This recipe is spot on! Crispy bites of chicken breast are tossed with a sweet chile sauce that, when served with rice or chow mein, creates the perfect Panda Express-inspired meal at home!

Psst - just asked Jason how far we lived from Panda Express and he said 2 miles! Whoop!


SweetFire Chicken {Panda Express Copycat}
2 boneless/skinless chicken breasts, cut into bite sized pieces
3/4 cup flour
2 eggs
1 cup cornstarch
3 tablespoons cornstarch
4 tablespoons cold water
1-2 teaspoons red pepper flakes
2 cloves garlic, minced
2/3 cup sugar
1 cup water
6 tablespoons white vinegar
1 can (20 oz) pineapple tidbits, drained
1 red bell pepper, cut into 1 inch pieces
1/2 onion, cut into 1 inch pieces
Canola or vegetable oil
Salt
Pepper
Green onions, thinly sliced

Set up for breading: place flour in a large Ziplock bag, put beaten eggs in a shallow dish, and put the 1 cup cornstarch in a second shallow dish. Salt and pepper the chicken then place them in the Ziplock, seal, and shake to coat. Using tongs, pull a chicken piece from the bag, dredge in egg, then coat in the cornstarch. Set aside. Repeat until all the chicken is coated.

In a large skillet, heat oil over medium-high heat. When hot, fry the chicken in batches being careful to not overcrowd. Set aside on a paper towel lined plate as they finish.

To make the sauce, stir together the cold water and 3 tablespoons cornstarch in a small bowl. Set aside. Combine the red pepper flakes, garlic, sugar, 1 cup water, vinegar, and some salt in a small saucepan. Heat until boiling then whisk in the cornstarch mixture. Whisk until the sauce is thickened, then reduce to low.

In the skillet you used for the chicken, heat a bit more oil and add the red bell pepper and onion. Cook until slightly softened, about 3 minutes. Add the pineapple and cook another minute.

Add the chicken back into the skillet along with the sauce and heat through.

Garnish with green onions.

Source: Feeding My Giant 

Monday, April 15, 2013

Funfetti Chocolate Chip Scones

You know what's awesome? Really, really awesome?

Sprinkles and chocolate chips for breakfast.

{especially if it's a MONDAY morning!}

Make these scones and you'll have a week's worth of sprinkles and chocolate chips to enjoy for breakfast. Or... as a mid-morning snack. Or dessert. Or something to "tide you over" until dinner. Not that I'd know anything about those type of eating habits...

Y'all know I'm not much of a baker so when I say you can whip these up in less than 10 minutes {using just 1 bowl!}, you know it's super easy. Much TOO easy, really. I don't typically have cake mix on hand but Aldi had Easter Funfetti mixes on clearance for 50 cents so I picked up a couple, came home, and went in search of a recipe using them. After the first batch came out, I sure was wishing I had bought more than 2 boxes!

These are not crumbly, dry, or hard; they are soft and almost muffin like inside with a nice thin crust on the outside. So really? They're just about perfect. (note: scones are typically sweet but not overly sweet due to the added flour. They won't taste as dessert-y as a funfetti cupcake, which makes them perfect for a morning treat!)


Funfetti Chocolate Chip Scones
1 1/4 cups Funfetti cake mix
1 1/4 cups flour (plus more for dusting)
1 stick (8 tablespoons) cold butter, diced
1 cup milk
1/2 cup mini chocolate chips
2 tablespoons sprinkles
 
Preheat the oven to 400 degrees. Line a cookie sheet with a Silpat or parchment paper. Do not grease.

Stir together the cake mix and flour in a large bowl. Add diced cold butter to the flour mixture. Use a pastry cutter or two knives and work the butter into the flour mixture, until it is crumbly.
 
Create a well in the center of the mixture and pour the milk in the center. Stir gently, keeping the dough in the center of the bowl, until the milk is incorporated. Stir only until the mixture comes together (there will be small chunks of butter still, and that’s okay). Stir in the chocolate chips.
 
Sprinkle a small bit of flour over the dough and flour your hands. Turn the dough out onto the prepared cookie sheet. Gently press the dough to flatten into a circle that is an 8 inch diameter. 
 
Use a greased knife to cut into wedges. Top with sprinkles and gently press them to make them stick.
 
Bake for 20-25 minutes, until a toothpick inserted comes out clean.
 
Source: slightly adapted from Crazy for Crust


Thursday, April 11, 2013

Tex Mex Cheese Enchiladas

In Texas, just about every Mexican restaurant has Wednesday night enchilada specials. I don't know why it's a thing... but it is. Now, given my line of work Wednesday nights weren't always a great night to have dinner out but occasionally, I'd have a Wednesday night off and we'd hit the nearest Mexican restaurant. Typically, the dinner included rice, beans, and two cheese enchiladas for $4.99. Plus bottomless chips and salsa. Great deal, right? And I certainly can't even MAKE it that cheap at home!

Tex Mex cheese enchiladas are very simple... and very tasty. Young and old LOVE cheese enchiladas. The enchiladas are simply cheese and diced raw onion (I always cut the onion!) wrapped in corn tortillas and smothered in a brown chili sauce. Many times, the sauce also has ground meat in it but not always. I actually prefer mine without. The sauce has no heat to it, it's just flavorful.

I first made these while still living in Texas simply because I wanted to see how close the recipe was to a restaurant version. Surprisingly, it was spot on. But seeing how cheap I could get a steaming hot place of cheese enchiladas right up the road, it was never made again. Until I moved to North Carolina... where you just can't find this style of cheese enchiladas. But since I can make it at home, we'll survive - though I sure wish it only cost us $4.99!

This recipe is quick and easy. Serve it with some mexican rice and crockpot refried beans and you've got a heck of a {Tex Mex style} dinner.

This recipe was originally shared in 2011. It needed a {slightly improved...} photo.

 
Tex Mex Cheese Enchiladas
1/2 cup vegetable oil
8 corn tortillas
3 cups shredded cheddar cheese
1 medium onion, diced (optional)
2 cups chili sauce (recipe below)

Preheat the oven to 450 and grease a large baking dish.

Soften the tortillas so they don't crack. You can do this two ways:
1. Pour the oil in a small skillet, and heat the tortillas one at a time. Keep them wrapped in a cloth
2. OR wrap them in a cloth towel and microwave until soft

Pour 1/2 cup of chili sauce in a baking pan.

Take a tortilla, put 1/4 cup of cheese and 1 tablespoon of onion in the center and roll it. Place rolled tortilla in baking dish, seam side down. Continue with remaining tortillas.

Take the remaining chili sauce and pour it over the rolled tortillas. Sprinkle remaining cheese and onions on top. Bake for 10 minutes or until sauce is bubbly and cheese is melted.
 
Chili Sauce
1/4 cup lard or vegetable oil
1/4 cup all-purpose flour
1/2 teaspoon black pepper
1 teaspoon powdered garlic
2 teaspoon ground cumin
1/2 teaspoon dried oregano
2 tablespoons chili power
2 cups beef broth, chicken broth or water
Salt, to taste

Heat the oil in a skillet over medium-high heat. Stir in the flour and continue stirring for 3 to 4 minutes, or until it makes a light brown roux.

Add the black pepper, powdered garlic, ground cumin, dried oregano, and chili powder and continue to cook for 1 minute, constantly stirring and blending ingredients. Add broth or water, mixing and stirring until the sauce thickens. Turn heat to low and let sauce simmer for 15 minutes. Add water to adjust the thickness. Taste and add salt, if needed.
 

Tuesday, April 9, 2013

Lemon Rosemary Coconut Oil Roasted Veggies

This winter, our dogs had the same issue I did - itchy, scratchy, uncomfortable skin. Since I had read that coconut oil would be a good thing to add to their diet, I picked some up at Trader Joes and started adding it to their food. Little did I know, we would ALL fall in love with the stuff.

The dogs could not get enough of the taste. I'm always thankful for a supplement that I don't have to mask in cheese or shove down their throat. And it did help their skin a lot!

And then I started to use it... not only for my dry skin (just rub it right into your skin!) but also to cook with! It's a healthy oil, and the subtle coconut flavor/smell is amazing.

Roasting veggies with it, though, really make the coconut undertones stand out - especially when paired with lemon and rosemary. And when using coconut oil, the veggies aren't oily at all like when you use other types of oil which makes it the perfect choice to roast with.

To be honest... I could eat vegetables roasted this way every single day and never tire of them. They're bright, fresh, and all that's right with vegetables. Pictured below are just Brussels sprouts but you can also roast asparagus, broccoli, green beans, carrots... really anything that looks tasty at the farmers market!


Lemon Rosemary Coconut Oil Roasted Veggies
4-5 cups favorite vegetables*
2-4 tablespoons coconut oil, divided**
2 tablespoons fresh rosemary, chopped
half of one lemon, squeezed for the juice
salt and pepper, to taste
 
Preheat oven to 425F. Line a baking sheet with a parchment paper or spray with cooking spray. Place vegetables on baking sheet. Drizzle with 2 tablespoons melted coconut oil or if solid, sprinkle small pea-sized pieces over the vegetables and toss vegetables to coat. Sprinkle with rosemary, salt, and pepper. Squeeze the juice from the lemon over the vegetables and bake for about 25 minutes, flipping them halfway through cooking. Add 1 to 2 additional tablespoons coconut oil, or as necessary, if they look dry when flipping.
 
Bake until vegetables are fork-tender and browned. Keep an eye on any cruciferous vegetables, especially broccoli, as it's prone to burning and pull it in advance of the other vegetables if necessary. Serve immediately. Extra vegetables can be stored in an airtight container in the refrigerator for up to 4 days.
 
*if using broccoli, cut into florets; asparagus, carrots, and green beans, trim; Brussels sprouts, half or even quarter if large
 
**if your home is warm, your coconut oil will be melted and in liquid form. If it's still solid, don't worry about melting it.
 
Source: Averie Cooks

Sunday, April 7, 2013

Cheesy Baked Skillet Pasta

As much as I love to cook, when I get home from work I really want to unwind some before jumping into dinner plans. Watch Ellen, play with the dogs, surf the net. And I realize that a lot of people don't have that luxury - especially if you have small children who eat early. Which makes this recipe even more of a winner for you.

Jason doesn't get home until 6:30 or later so I usually have an hour or so before he gets home to just chill. Or cook dinner. But usually chill. And right before he gets home, I launch into whatever meal we're having that night. I almost always plan our weekday menu to be quick and easy so I'm not stuck in the kitchen too long.

Pasta, in my book, is always a good idea. Cheese? Also a good idea. Put them together and it's a great meal. This cheesy baked pasta is just that - GREAT. It's super fast, has a short list of ingredients, and serves up a big skillet full of cheesy pasta which is guaranteed to please even the pickiest eater.

This is like baked ziti... but easier. And on the table in 30 minutes!

Pasta and cheese for the win!


Cheesy Baked Skillet Pasta
1 pound gemelli pasta or other short cut pasta
1 tablespoon olive oil
2 large cloves garlic, minced
1 (28 ounce) can san marzano whole peeled tomatoes
1 teaspoon dried basil
2 teaspoon dried parsley
1 teaspoon dried oregano
1 teaspoon crushed red pepper
1 (8 ounch) can tomato sauce
salt & pepper
1 1/2 cups shredded gouda cheese
1 cup shredded mozzarella cheese
1/2 cup grated parmesan cheese, plus more for serving
 
Cook pasta according to directions on package. Drain and set aside. Preheat broiler.
 
Heat olive oil in a large oven safe skillet. Saute garlic over medium high heat for 1-2 minutes, stirring so the garlic doesn’t burn. Add tomatoes, basil, parsley, oregano and crushed red pepper. Season with salt and pepper. Break up the tomatoes using the back of a wooden spoon and simmer for 5-10 minutes or until mixture thickens slightly. Add the tomato sauce and 1/4 cup parmesan cheese.
 
Remove from heat and stir in cooked pasta and shredded gouda, being careful to mix well.  
 
Top with the mozzarella cheese and place under broiler for 5-8 minutes or until cheese is melted and bubbly.
 
Source: slightly adapted from Half Baked Harvest

Friday, April 5, 2013

"Make a Bear" Preschool Party

I've mentioned before that one of the cool things about my job is event planning, primarily for families with children. Awhile back, one of these events was just for preschoolers (age 0-5). At a previous church I served, I did a teddy bear pajama party that was a big hit so I decided to go with the same idea.

The event lasted just 1.5 hours because let's face it - preschoolers can only go so long. Even an hour is long enough! They were encouraged to wear their favorite PJs and bring their favorite stuffed animal. This was the invite I created:


When they arrived, they followed the paw prints up the stairs and into the room.

First up was building a bear! Except, we didn't really "build a bear" because they're super pricey. We "made a bear" :)

I ordered the bears from this great company, BEARegards. For less than $10 a bear, we got a high quality bear skin, bag of stuffing, bear t-shirt to decorate, full color birth certificate, and wishing star. Since it was the main activity at the event, I thought this was a great price AND sent each child home with something that wouldn't be tossed in the trash immediately. I'm working on a budget so I opted to bypass other things that would add up, like a treat bag of junk, in order to do this.

Box of bear skins:

Box of stuffing bags:

I set up a table for t-shirt decorating. Though I'm all about glitter and paint, I wanted them to 1) go home with a {dry} tshirt at the end of the party and 2) didn't want to ruin their PJs so we stuck with Crayola fabric markers. I also cut small squares of cardboard to put inside each shirt so the paint wouldn't bleed through.


Thankfully, the shirts actually dried within minutes so as soon as they were done stuffing their bear, the shirt could go on.

After their shirts were done (which takes some preschoolers 15.5 seconds and other preschoolers 25 minutes) they grabbed a bear and bag of stuffing and sat with their parents to stuff the bear. A preschool can do a lot of the stuffing but it does take some adult help.

 
Before sealing it up, they picked out a star, made a wish, and put it inside their bear.


Last stop was the birth certificate!

 
BEARegards has a ton of different animal options but I'm no fool - it's always better to have the same option for everyone at a party like this. I went with a classic 15 inch long haired brown bear and he was SUPER soft and huggable.
 
 
Once most of the kids were finished, we went on a bear hunt - aka, a bear scavenger hunt. I "hid" colored bears (die cut on construction paper) throughout the space. The first bear was pink so we went in search of a pink bear hanging on the wall. Under the pink bear was a cup with another colored bear in it. That told us what color to find next. We were in a church so I hid them throughout the floor.


When we got to the last one, we all got a prize - a treat sized container of playdough.


Then we played some group games like dance freeze. I put colored die cut bears on the floor and when the music stopped, I called out a color and bear part (teddy bear nose, mouth, foot, etc) and they found that color and put that part of their bear on the color. We played variations of this. I also put out bear coloring pages and crayons for kids that wanted to color for awhile.

Though we didn't do a meal, we did have snacks on hand.


Cups included: goldfish (aka, staple of preschooler diets everywhere), fruit snacks, pretzels, and teddy bear mix. The mix included: chocolate, chocolate chip, and cinnamon teddy grahams, honeycrisp cereal, and honey nut cheerios. Bears love honey, right?


And of course, apple juice boxes and small bottles of water.

I put the snacks in cups because they are easier for preschoolers to transport and eat from. It's cheaper to do plates or napkins but not as easy for them to handle. Using cups also meant we had less spillage to clean up after!

At the end of our evening, we did a bedtime story with cookies and (white or chocolate) milk. I ordered teddy bears from a local bakery, Kai's Kookies, and she did a great job! I ordered small bears so it'd be more preschool friendly.


All the kids sat on blankets and pillows with their bear, cookies, and milk and I read the book Corduroy.


The event went well and both the kids and parents seemed to have a good time. Now I'll just stow away the "extras" and repeat it in a few years with a new batch of preschoolers :)


See Aimee Cook


Follow on Bloglovin

Designed by:

Munchkin Land Designs Elements by Amy Teets
I was featured, I was Featured by Addicted to Recipes
What's cooking, love?
Lil\'Luna
Mandy's Recipe Box
 
Designed by Munchkin Land Designs • Copyright 2012 • All Rights Reserved