mozzarella + jalapenos
and
buffalo sauce + chicken + blue cheese
with
bacon and four more types of cheese
=
Amazeballs. The end.
Y'all, I'm posting this on New Years Eve because I want you to enjoy this before you start with your "lose weight - eat better" resolution tomorrow. It's obscenely bad for you... but it's a delicious treat. And honestly, it's so decadent that you won't eat your weight in it. Well, at least we couldn't.
It is, however, one of the most amazing mac and cheeses I've put in my mouth. And I love me some mac and cheese. The ingredient list looks long but don't be overwhelmed - it's easy to toss together and you probably have most of it already in your pantry.
{Plus it's totally worth the effort}
Jalapeno Popper Buffalo Chicken Mac & Cheese
4 slices of bacon
1/2 large onion, diced {about 1 1/4 cups}
2 jalapenos, sliced {ribs and seeds removed}
1 pound elbow macaroni
for the sauce-
4 tablespoons butter
5 tablespoons all purpose flour
2 cups milk {whole or 2%}
1/4 cup heavy cream
salt & pepper, to taste
1 pinch nutmeg
2 ounces cream cheese
1 tablespoon hot sauce {such as Frank’s Red Hot}
2 1/2 cups grated cheddar cheese
1 cup grated mozzarella cheese
1/4 cup grated provolone
1/4 cup blue cheese crumbles
1 cup precooked and shredded chicken {optional}
for the topping-
1 cup corn flakes, crushed, or panko {optional}
1/3 cup blue cheese crumbles
In a large skillet, cook bacon until crispy. Remove from pan, drain on paper towels and crumble. Pour off excess bacon drippings, keeping 2 tablespoons in the pan. Place skillet back on heat and saute onion and jalapenos until soft, about 6 minutes over medium heat. Set aside.
Bring large pot of water to boil. Salt water generously and cook pasta 2 minutes short of package directions. You want the macaroni to be very al dente, but not still crunchy. Drain and set aside.
Preheat oven to 350 degrees.
In the same pot, melt butter over medium heat. Whisk in flour and cook 1-2 minutes. Whisk in milk, cream, salt, pepper, and nutmeg. Increase heat to medium high and continue mixing until sauce thickens. Stir in cream cheese and hot sauce until melted smoothly into the sauce. Stir in cheeses. Pour cooked pasta, sauteed onions, and jalapenos into the sauce. Stir to coat. Stir in chicken.
Pour into a buttered baking dish {around 9×13 size} and spread out evenly. Top with blue cheese, corn flakes or panko, if desired, and crumbled bacon. Bake 20-30 minutes until top of macaroni has browned.
Eat.
Source: Lauren's Latest
Monday, December 31, 2012
Friday, December 28, 2012
Top 12 of 2012!
Here are my top 12 recipes from 2012 in case you missed one along the way!
Thanks for following along this year!
Thursday, December 27, 2012
Sausage Stuffed Acorn Squash
Merry Belated Christmas! We opted to not travel out of town to see family but were invited by friends to join their family for a delicious Christmas lunch. It was a laid back and relaxing day for us. Whether spent with family near or far, I hope your Christmas was lovely.
And now for a perfect winter dinner!
Acorn squash has always been a favorite fall/winter vegetable of mine. I have fond memories of mom baking them with brown sugar and serving them alongside pork chops. While a great side to just about any protein, transforming squash into a "one pot meal" is a new favorite way to enjoy it. The sausage stuffing is flavorful, delicious, and perfect when mixed with the tender and slightly sweet acorn squash.
Don't be scared away from the inclusion of the apple! It adds a bit of sweet to balance out the natural spice in the sausage.
Sausage Stuffed Acorn Squash
2 acorn squash, halved and seeded
2 tablespoon butter, melted
1 clove of garlic, finely minced
1/4 teaspoon ground sage
1 lb mild sausage
1/2 cup onion, finely chopped
1 celery rib, finely chopped
4 ounces mushrooms, chopped
1 apple, cored and chopped
1 cup panko crumbs
1/4 cup grated Parmesan cheese
1/2 teaspoon sage
salt and pepper
1 egg, beaten
Preheat oven to 400 degrees.
Combine the melted butter, garlic, and 1/4 tsp sage. Brush the inside and outside of each squash with the butter mix. Place the squash on a cookie sheet, cut side up, and roast for 50-60 minutes, or until fork tender.
In a large skillet over medium heat, brown the sausage. When the sausage is browned, remove it from the pan and place on a paper towel lined plate, set aside. To the skillet add the onions, celery, and mushrooms and cook for 3 minutes. Add the apples and cook for another 2 minutes.
Return the sausage to the skillet then remove from heat. Season with remaining sage, salt, and pepper. Stir in the panko and Parmesan. Add the egg and stir to combine.
Divide the stuffing evenly among the four squash halves. Return to the oven and bake for another 20 minutes.
Source: Sunny Side Up
And now for a perfect winter dinner!
Acorn squash has always been a favorite fall/winter vegetable of mine. I have fond memories of mom baking them with brown sugar and serving them alongside pork chops. While a great side to just about any protein, transforming squash into a "one pot meal" is a new favorite way to enjoy it. The sausage stuffing is flavorful, delicious, and perfect when mixed with the tender and slightly sweet acorn squash.
Don't be scared away from the inclusion of the apple! It adds a bit of sweet to balance out the natural spice in the sausage.
Sausage Stuffed Acorn Squash
2 acorn squash, halved and seeded
2 tablespoon butter, melted
1 clove of garlic, finely minced
1/4 teaspoon ground sage
1 lb mild sausage
1/2 cup onion, finely chopped
1 celery rib, finely chopped
4 ounces mushrooms, chopped
1 apple, cored and chopped
1 cup panko crumbs
1/4 cup grated Parmesan cheese
1/2 teaspoon sage
salt and pepper
1 egg, beaten
Preheat oven to 400 degrees.
Combine the melted butter, garlic, and 1/4 tsp sage. Brush the inside and outside of each squash with the butter mix. Place the squash on a cookie sheet, cut side up, and roast for 50-60 minutes, or until fork tender.
In a large skillet over medium heat, brown the sausage. When the sausage is browned, remove it from the pan and place on a paper towel lined plate, set aside. To the skillet add the onions, celery, and mushrooms and cook for 3 minutes. Add the apples and cook for another 2 minutes.
Return the sausage to the skillet then remove from heat. Season with remaining sage, salt, and pepper. Stir in the panko and Parmesan. Add the egg and stir to combine.
Divide the stuffing evenly among the four squash halves. Return to the oven and bake for another 20 minutes.
Source: Sunny Side Up
Thursday, December 20, 2012
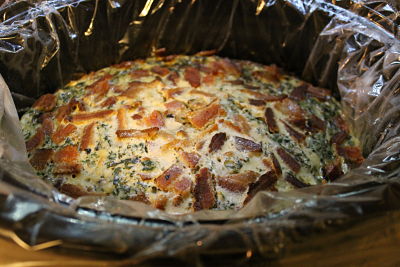
Crockpot Spinach and Mushroom Quiche
I think my husband is the only person in the world that doesn't like crust. Pie crust, quiche crust, even pizza crust! I adore quiche but always hear whining from the other side of the table couch about the crust. So, when I saw this crustless quiche I knew he'd especially love it.
{which he did}
A traditional quiche is easy to make but does take awhile to bake (especially for a weeknight meal). I loved coming home to the quiche already finished and ready to eat! It was perfectly cooked through with lots of flavor thanks to the veggies, herbs, cheese and - of course - bacon.
Crustless Spinach and Mushroom Quiche
1 disposable slow cooker liner
8 eggs
Line a 3-1/2- or 4-quart slow cooker with disposable slow cooker liner; coat liner with cooking spray.
Using clean paper towels, press spinach to remove as much liquid as possible; set aside.
{which he did}
A traditional quiche is easy to make but does take awhile to bake (especially for a weeknight meal). I loved coming home to the quiche already finished and ready to eat! It was perfectly cooked through with lots of flavor thanks to the veggies, herbs, cheese and - of course - bacon.
Crustless Spinach and Mushroom Quiche
1 disposable slow cooker liner
Nonstick cooking spray
10 ounce package frozen chopped spinach, thawed and well drained
4 slices bacon
1 tablespoon olive oil
2 cups coarsely chopped portobello mushrooms
1/2 cup chopped red sweet pepper (1 small)
1 1/2 cups shredded Gruyere cheese or Swiss cheese (6 ounces)8 eggs
2 cups half-and-half or whole milk
2 tablespoons snipped fresh chives
1/2 teaspoon salt
1/4 teaspoon ground black pepper
1/2 cup packaged biscuit mix
Line a 3-1/2- or 4-quart slow cooker with disposable slow cooker liner; coat liner with cooking spray.
Using clean paper towels, press spinach to remove as much liquid as possible; set aside.
In a medium skillet cook bacon until crisp; drain, crumble, and set aside. Discard drippings. In same skillet heat oil over medium heat. Add mushrooms and sweet pepper; cook and stir until tender. Stir in spinach and cheese.
In a medium bowl combine eggs, half-and-half, chives, salt, and black pepper. Stir egg mixture into spinach mixture in skillet. Gently fold in biscuit mix. Pour egg mixture into prepared slow cooker. Sprinkle with bacon.
Cover and cook on low-heat setting for 4 to 5 hours or on high-heat setting for 2 to 2-1/2 hours or until a knife inserted into the center comes out clean.
*Mine lifted out easily using the liner - which makes it a piece of cake to cut/serve!
Source: Better Homes and Gardens
Wednesday, December 19, 2012
Homemade Pimento Cheese
People in North Carolina are serious about their pimento cheese.
Don't get me wrong; people in Texas eat pimento cheese, too. I remember buying pimento cheese sandwiches at the Czech Stop in West, Texas anytime we traveled up or down I-35. But it wasn't a staple at every family gathering, church potluck, or camp meal like it is here.
Yep, we had pimento cheese offered everyday at (children and youth) camp. And not just the kind sold in a tub at the grocery store, I mean the homemade kind. And I may or may not have eaten quite a bit of it that week...
I truly think I've eaten it 12,438 times since moving here in June. Not that I'm complaining.
I've never made it myself so I thought I'd give it a shot. No doubt there are lots of homemade secrets out there that I haven't tapped into yet but this was a great start. It was sharp and tangy, but also smooth and cheesy. You can't get much better than a huge scoop of this slathered on two pieces of soft white bread. Or, you could kick it North Carolina style and slather it on your hamburger in place of a slice of cheese, use it for grilled cheese, warm it up and dip crackers in it, or stir it into grits. Anyway you serve it, it's good eatin'.
Drain the pimientos and pat dry with a paper towel.
In a medium bowl, combine all the ingredients and use a rubber spatula to combine. Taste and adjust seasonings to your preference. Before serving, refrigerate at least 1 hour to allow the flavors to meld.
Source: Tide and Thyme
Don't get me wrong; people in Texas eat pimento cheese, too. I remember buying pimento cheese sandwiches at the Czech Stop in West, Texas anytime we traveled up or down I-35. But it wasn't a staple at every family gathering, church potluck, or camp meal like it is here.
Yep, we had pimento cheese offered everyday at (children and youth) camp. And not just the kind sold in a tub at the grocery store, I mean the homemade kind. And I may or may not have eaten quite a bit of it that week...
I truly think I've eaten it 12,438 times since moving here in June. Not that I'm complaining.
I've never made it myself so I thought I'd give it a shot. No doubt there are lots of homemade secrets out there that I haven't tapped into yet but this was a great start. It was sharp and tangy, but also smooth and cheesy. You can't get much better than a huge scoop of this slathered on two pieces of soft white bread. Or, you could kick it North Carolina style and slather it on your hamburger in place of a slice of cheese, use it for grilled cheese, warm it up and dip crackers in it, or stir it into grits. Anyway you serve it, it's good eatin'.
Homemade Pimento Cheese
8 oz. extra sharp cheddar, shredded (you have to shred it yourself!)
4 oz. diced pimentos
2 Tbs Greek yogurt
2 Tbs mayonnaise (the real deal - not Miracle Whip)
1/2 tsp Worcestershire sauce
squeeze of lemon juice
salt and pepper to taste
4 oz. diced pimentos
2 Tbs Greek yogurt
2 Tbs mayonnaise (the real deal - not Miracle Whip)
1/2 tsp Worcestershire sauce
squeeze of lemon juice
salt and pepper to taste
In a medium bowl, combine all the ingredients and use a rubber spatula to combine. Taste and adjust seasonings to your preference. Before serving, refrigerate at least 1 hour to allow the flavors to meld.
Source: Tide and Thyme
Monday, December 17, 2012
In remembrance...
Friends,
The events on Friday have left me heartbroken, as I know it's left you as well. I have recipes ready to share but simply haven't been able to put together a post. I'll be back soon.
Thanks for stopping by.
The events on Friday have left me heartbroken, as I know it's left you as well. I have recipes ready to share but simply haven't been able to put together a post. I'll be back soon.
Thanks for stopping by.
Thursday, December 13, 2012
Crockpot Mediterranean Beef Stew w/Rosemary and Balsamic Vinegar
Growing up, every gathering of my mom's family included black olives. Us kids would down them faster than anything else on the buffet table. I suppose there are worse things to indulge in at Christmas, yes? I still have a deep love of all olives ~ especially black olives. When I spotted the olives proudly displayed in the forefront of this dish, I knew we were meant to give it a shot.
The olives are delicious but the stew is so much more. Thanks to the browned meat, garlic, capers, fresh herbs, and a healthy dose of balsamic vinegar, this stew explodes with flavor! It does take some browning prior to throwing it in the crockpot but I think it's worth the extra step to get the maximum flavor.
With the weather turning chilly, this is a belly warming meal you'll enjoy coming home to.
Mediterranean Beef Stew w/Rosemary and Balsamic Vinegar
1-2 T olive oil
8 oz. sliced mushrooms
1 onion, diced in 1/2 inch pieces
2 lbs. trimmed and diced chuck steak, cut in bite-sized pieces
1 cup beef stock
1 can (14.5 oz.) diced tomatoes with juice
1/2 cup tomato sauce
1/4 cup balsamic vinegar
1 can black olives, cut in half or fourth
1/2 cup garlic cloves, cut in thin slices
2 T finely chopped fresh rosemary (or use 1 T dried cracked rosemary)
2 T finely chopped fresh parsley (or use 1 T dried parsley)
1 T capers (or more)
fresh ground black pepper and salt to taste
Heat small amount of olive oil in heavy frying pan, add mushrooms and saute several minutes, until starting to brown. Add mushrooms to slow cooker. Add a little more oil, then saute diced onions about 5 minutes, or until starting to brown. Add mushrooms to slow cooker. Add a little more oil again, then add diced beef and brown well, about 10-15 minutes. Don't rush the browning step. Add beef to the slow cooker.
Add 1 cup beef stock to the pan and simmer a few minutes until slightly reduced, scraping off all browned bits, then add that stock to the slow cooker. Add diced tomatoes and juice, tomato sauce, balsamic vinegar, olives, garlic, rosemary, parsley, capers, and a little black pepper. Stir gently to combine, then put lid on Crockpot and cook 6-8 hours on low. Season to taste with salt and more fresh ground black pepper and serve hot.
Source: Kalyn's Kitchen
The olives are delicious but the stew is so much more. Thanks to the browned meat, garlic, capers, fresh herbs, and a healthy dose of balsamic vinegar, this stew explodes with flavor! It does take some browning prior to throwing it in the crockpot but I think it's worth the extra step to get the maximum flavor.
With the weather turning chilly, this is a belly warming meal you'll enjoy coming home to.
Mediterranean Beef Stew w/Rosemary and Balsamic Vinegar
1-2 T olive oil
8 oz. sliced mushrooms
1 onion, diced in 1/2 inch pieces
2 lbs. trimmed and diced chuck steak, cut in bite-sized pieces
1 cup beef stock
1 can (14.5 oz.) diced tomatoes with juice
1/2 cup tomato sauce
1/4 cup balsamic vinegar
1 can black olives, cut in half or fourth
1/2 cup garlic cloves, cut in thin slices
2 T finely chopped fresh rosemary (or use 1 T dried cracked rosemary)
2 T finely chopped fresh parsley (or use 1 T dried parsley)
1 T capers (or more)
fresh ground black pepper and salt to taste
Heat small amount of olive oil in heavy frying pan, add mushrooms and saute several minutes, until starting to brown. Add mushrooms to slow cooker. Add a little more oil, then saute diced onions about 5 minutes, or until starting to brown. Add mushrooms to slow cooker. Add a little more oil again, then add diced beef and brown well, about 10-15 minutes. Don't rush the browning step. Add beef to the slow cooker.
Add 1 cup beef stock to the pan and simmer a few minutes until slightly reduced, scraping off all browned bits, then add that stock to the slow cooker. Add diced tomatoes and juice, tomato sauce, balsamic vinegar, olives, garlic, rosemary, parsley, capers, and a little black pepper. Stir gently to combine, then put lid on Crockpot and cook 6-8 hours on low. Season to taste with salt and more fresh ground black pepper and serve hot.
Source: Kalyn's Kitchen
Monday, December 10, 2012
Louisiana Chicken Pasta
I've been using Pinterest as my online recipe box these days. It's the first place I go when menu planning and where I catalog recipes I come across online while perusing blogs or cooking sites. Matter of fact, I've gotten in the habit of Googling recipes from magazines and pinning the recipe so I can toss the magazine. I'm trying really had to cut down on "stuff" in our new house. So far, this has worked great since almost all print magazines also catalog their recipes on their website!
This recipe was one I pinned a long time ago. Pinterest says I pinned it a year ago, actually. For whatever reason, I kept passing over it when menu planning. I think I was scared it would be OMGSPICY since it was cajun inspired. And if I took down the spices a notch, it would be flavorless.
Well needless to say, I was totally and completely wrong. I used all the spice except for the cayenne and while it had some heat, it was good heat. Not burn your face off heat. This recipe is a knock-off of the popular Cheesecake Factory dish of the same name except that Annie lightened it up some by not frying the chicken. It's still not light, don't get me wrong, but it's sooooooooo gooooooooood it's worth the splurge. So good that we'll probably have it again soon - which is a rarity in this house. It also cooks up fast and doesn't use a ton of dishes!
{Notice something missing in the picture? I left out the peppers, as we don't/can't eat them but I'm still including it in the recipe - veggies are always good!}
Louisiana Chicken Pasta
Salt and pepper
Cajun seasoning
Kosher salt
1 tbsp. olive oil
1 red bell pepper, seeded and coarsely chopped
1 green bell pepper, seeded and coarsely chopped
1/4 cup yellow onion, chopped
3/4 tsp. kosher salt
Freshly ground black pepper, to taste
1/4 tsp. garlic powder
1/2 tsp. Cajun seasoning
1/4 tsp. ground cayenne pepper
1 cup half-and-half
1/2 cup heavy cream
1 tbsp. cornstarch
1 tbsp. water
3 scallions, chopped
This recipe was one I pinned a long time ago. Pinterest says I pinned it a year ago, actually. For whatever reason, I kept passing over it when menu planning. I think I was scared it would be OMGSPICY since it was cajun inspired. And if I took down the spices a notch, it would be flavorless.
Well needless to say, I was totally and completely wrong. I used all the spice except for the cayenne and while it had some heat, it was good heat. Not burn your face off heat. This recipe is a knock-off of the popular Cheesecake Factory dish of the same name except that Annie lightened it up some by not frying the chicken. It's still not light, don't get me wrong, but it's sooooooooo gooooooooood it's worth the splurge. So good that we'll probably have it again soon - which is a rarity in this house. It also cooks up fast and doesn't use a ton of dishes!
{Notice something missing in the picture? I left out the peppers, as we don't/can't eat them but I'm still including it in the recipe - veggies are always good!}
Louisiana Chicken Pasta
For the chicken:
1 large boneless, skinless chicken breast, cut into
bite-sized piecesSalt and pepper
Cajun seasoning
For the pasta:
8 oz. bowtie pastaKosher salt
For the sauce:
1 tbsp. butter1 tbsp. olive oil
1 red bell pepper, seeded and coarsely chopped
1 green bell pepper, seeded and coarsely chopped
1/4 cup yellow onion, chopped
3/4 tsp. kosher salt
Freshly ground black pepper, to taste
1/4 tsp. garlic powder
1/2 tsp. Cajun seasoning
1/4 tsp. ground cayenne pepper
1 cup half-and-half
1/2 cup heavy cream
1 tbsp. cornstarch
1 tbsp. water
3 scallions, chopped
To cook the chicken, heat a small amount of butter or
olive oil in a large skillet over medium-high heat. Season the chicken pieces
with salt and pepper, and a generous sprinkle of Cajun seasoning. Add to the
skillet and cook until lightly browned and cooked through. Transfer to a plate
and set aside.
Bring a pot of salted water to boil. Cook the pasta
according to package directions. Drain the cooked pasta and set
aside.
Meanwhile, return the skillet to medium heat and heat
the butter and olive oil until the butter has melted. Add the bell peppers and
onion to the pan. Mix in the salt, pepper, Cajun seasoning, and cayenne pepper.
Cook until the vegetables are tender, about 6-8 minutes. Add the half-and-half
and heavy cream to the pan and bring to a simmer. In a small bowl, whisk
together the cornstarch and water, and add to the skillet once the cream mixture
has started to bubble. Allow to cook until thickened, about 5
minutes.
When the sauce has thickened, add the cooked pasta
and chicken pieces to the pan. Stir well to combine and cook at medium-low heat
just until the chicken is warmed through. Adjust the amount of Cajun seasoning
if necessary to suit your tastes. Stir in the scallions. Serve immediately and
top with additional Cajun seasoning, if desired.
Source: Annie's Eats
Wednesday, December 5, 2012
Pork Chops with Balsamic-Maple Glaze
When I menu plan, I try to include a variety of protein sources. I think it's really easy to get stuck in the "boneless/skinless chicken breasts" routine, which gets old. Pork is a great alternative to chicken. Like chicken, pork can take on a variety of flavors really well and cooks fast. Plus, it's relatively low calorie if you trim it down well. We don't eat nearly enough pork in our house - despite my deep, deep love for bacon - which I'm trying to change. While in search for easy pork recipes that didn't require an entire tenderloin, I came across this one!
This particular recipe cooks up fast and uses items that you probably already have on hand. It's delicious and easy to pair with a variety of side dishes and veggies - definitely a great weeknight meal!
Pork Chops with Balsamic-Maple Glaze
4 pork chops (I always use boneless)
4 tsp. herbs de Provence
salt and pepper
4 tsp. olive oil
1/2 cup balsamic vinegar
2 Tbsp. pure maple syrup
Pat the pork chops dry and then rub each chop with 1 tsp. of herbs de Provence. Sprinkle both sides with salt and pepper. Heat a heavy-bottomed skillet over medium heat and add the oil. Once hot, add the pork chops and cook until a little underdone (about 2-3 minutes per side, will vary depending on thickness, etc.). Remove pork chops from the pan.
Increase the heat to medium-high and add the balsamic vinegar. Deglaze the pan, scraping up all the browned bits, and reduce the vinegar by about half. Stir in the maple syrup. Add the pork chops back into the skillet and continue cooking until done, about a minute per side. Most of the glaze should be soaked up by the chops. Drizzle the chops with any additional glaze.
Source: Elly Says Opa
This particular recipe cooks up fast and uses items that you probably already have on hand. It's delicious and easy to pair with a variety of side dishes and veggies - definitely a great weeknight meal!
Pork Chops with Balsamic-Maple Glaze
4 pork chops (I always use boneless)
4 tsp. herbs de Provence
salt and pepper
4 tsp. olive oil
1/2 cup balsamic vinegar
2 Tbsp. pure maple syrup
Pat the pork chops dry and then rub each chop with 1 tsp. of herbs de Provence. Sprinkle both sides with salt and pepper. Heat a heavy-bottomed skillet over medium heat and add the oil. Once hot, add the pork chops and cook until a little underdone (about 2-3 minutes per side, will vary depending on thickness, etc.). Remove pork chops from the pan.
Increase the heat to medium-high and add the balsamic vinegar. Deglaze the pan, scraping up all the browned bits, and reduce the vinegar by about half. Stir in the maple syrup. Add the pork chops back into the skillet and continue cooking until done, about a minute per side. Most of the glaze should be soaked up by the chops. Drizzle the chops with any additional glaze.
Source: Elly Says Opa
Monday, December 3, 2012
Ginger Burst Cookies
Church members are usually incredibly generous when it comes to caring for their ministerial staff - especially at Christmas. Last year, one of the gifts I received was a box of these cookies. The recipe had been created and submitted to the local paper in a holiday cookie contest and a local grocery store chain made and sold the winning entry.
I usually receive quite a few baked goods but few disappear as quickly as these. Jason and I fought over the last cookie and I vowed to track down the recipe and make them this year.
Thankfully, they were just as good as I remembered! They are buttery, a bit chewy, and have such great flavor. A delicious twist on the traditional gingersnap. If you want to bake up something unique this Christmas, these are your go-to cookies.
Psst - don't leave out the crystallized ginger, it really takes the cookies over the top. I found it in the bulk section of the grocery store but have also seen them already bagged.
Ginger Burst Cookies
3/4 cup sugar
1/4 cup brown sugar
3/4 cup unsalted butter, softened
1 egg
1/4 cup molasses
2 1/4 cups flour
2 tsp baking soda
1 tsp cinnamon
1/2 tsp ginger
1/4 tsp nutmeg
1/2 tsp cloves
3/4 cup crystallized ginger, chopped
1/2 tsp salt
sugar for rolling
Preheat oven to 350 degrees.
In a large bowl, combine sugars, unsalted butter (softened), egg, and molasses. Beat until light and fluffy. Add flour, baking soda, spices, crystallized ginger and salt. Mix well. Cover with plastic wrap and refrigerate 1 hour for easier handling.
Shape dough into 1 inch (or smaller) balls; roll in sugar. Place on ungreased cookie sheet and bake for 9-12 minutes.
Source: Winning entry of Fort Worth Star Telegram 2011 "Very Merry Cookie Challenge"
Recipe found at Central Market
Sunday, December 2, 2012
Skillet Chicken Tikka Masala
Man alive, I love Indian food! I think anyone who doesn't like it probably hasn't tried tikka masala. Tikka masala is simply a dish of chicken in a creamy spiced tomato sauce. The flavor is amazing - between the indian flavors and the heavy cream, how can it not be? It's evidently especially popular in Britain, though I wouldn't know since I've yet to visit there :)
I've made two other recipes for tikka masala, including my favorite, but as you can see, that ingredient list is quite long and the sauce is complex. This recipe gives you a great flavor without a long list of ingredients or time consuming steps. It was delicious, easy, and a great way to get that Indian flavor I love in a hurry.
Serve over rice with some store bought naan and you've got a tasty weeknight meal!
Skillet Chicken Tikka Masala
1 (14.5 oz) can diced tomatoes
1 1/4 lb boneless, skinless chicken breasts, cut into 1-inch pieces
1 tablespoon vegetable oil
1 onion, finely chopped
1 tablespoon garam marsala
2 garlic cloves, minced
2 teaspoons grated fresh ginger
1/2 cup heavy cream
2 tablespoons chopped fresh parsley
Add the tomatoes to the bowl of your food processor and pulse just until partially broken down.
Pat the chicken dry then season with salt and pepper. Add the oil to a large skillet set over medium-high heat. When the oil shimmers, add the chicken and cook until browned on all sides, about 5 minutes. Remove to a plate.
Reduce the heat to medium and add the onion to the pan. Cook for 4-5 minutes, or until softened. Stir in the garam marsala, garlic and ginger and cook just until fragrant, only about 1 minute. Add the tomatoes and bring the mixture to a simmer then reduce the heat to medium-low. Cover and cook for 2-3 minutes, or until the mixture has thickened slightly.
Stir in the cream and return the browned chicken pieces (and any accumulated juices) to the pan. Allow the sauce to simmer until thickened (it'll only take a few minutes), then stir in the parsley and season to taste with salt and pepper. Serve over rice.
Source: Tracey's Culinary Adventures
I've made two other recipes for tikka masala, including my favorite, but as you can see, that ingredient list is quite long and the sauce is complex. This recipe gives you a great flavor without a long list of ingredients or time consuming steps. It was delicious, easy, and a great way to get that Indian flavor I love in a hurry.
Serve over rice with some store bought naan and you've got a tasty weeknight meal!
Skillet Chicken Tikka Masala
1 (14.5 oz) can diced tomatoes
1 1/4 lb boneless, skinless chicken breasts, cut into 1-inch pieces
1 tablespoon vegetable oil
1 onion, finely chopped
1 tablespoon garam marsala
2 garlic cloves, minced
2 teaspoons grated fresh ginger
1/2 cup heavy cream
2 tablespoons chopped fresh parsley
Add the tomatoes to the bowl of your food processor and pulse just until partially broken down.
Pat the chicken dry then season with salt and pepper. Add the oil to a large skillet set over medium-high heat. When the oil shimmers, add the chicken and cook until browned on all sides, about 5 minutes. Remove to a plate.
Reduce the heat to medium and add the onion to the pan. Cook for 4-5 minutes, or until softened. Stir in the garam marsala, garlic and ginger and cook just until fragrant, only about 1 minute. Add the tomatoes and bring the mixture to a simmer then reduce the heat to medium-low. Cover and cook for 2-3 minutes, or until the mixture has thickened slightly.
Stir in the cream and return the browned chicken pieces (and any accumulated juices) to the pan. Allow the sauce to simmer until thickened (it'll only take a few minutes), then stir in the parsley and season to taste with salt and pepper. Serve over rice.
Source: Tracey's Culinary Adventures
Thursday, November 29, 2012
Chicken Fried Steak
This tastes like Texas, y'all.
We've only been out of our homestate for 5 months or so and have already noticed the lack of chicken fried steak in this state.
{We're now in North Carolina}
I even lamented about this first world problem on our personal blog.
We desperately needed a chicken fried steak fix and desperate times comes for desperate measures. Which meant chicken fried steak is going to be a staple on our menu at home. I hadn't made it in awhile (truthfully, Jason usually makes this particular dish at our house!) so I referred to The Pioneer Woman for a brush-up on the method.
Making it isn't hard, but it is hard to give exact measurements. It's more of a "does it look right?" dish that also requires lots of tasting along the way. You can always tweak it to your tastes. I like my gravy thick but others like a thinner consistency. Easy to tweak!
Chicken fried steak is essentially just a piece of extra tenderized (read: beaten repeatedly) steak that has been double dipped in flour/egg, pan fried until cooked through, and topped with creamy gravy you whipped up with the pan drippings. It's fork tender and A.MA.ZING. It should always {always!} be served with a big pile of creamy mashed potatoes that have also been topped with the gravy. And it's totally calorie free...
If you want step by step pictures, take a look at The Pioneer Woman's page. I'm way too scatterbrained to take pictures along the way :)
We've only been out of our homestate for 5 months or so and have already noticed the lack of chicken fried steak in this state.
{We're now in North Carolina}
I even lamented about this first world problem on our personal blog.
We desperately needed a chicken fried steak fix and desperate times comes for desperate measures. Which meant chicken fried steak is going to be a staple on our menu at home. I hadn't made it in awhile (truthfully, Jason usually makes this particular dish at our house!) so I referred to The Pioneer Woman for a brush-up on the method.
Making it isn't hard, but it is hard to give exact measurements. It's more of a "does it look right?" dish that also requires lots of tasting along the way. You can always tweak it to your tastes. I like my gravy thick but others like a thinner consistency. Easy to tweak!
Chicken fried steak is essentially just a piece of extra tenderized (read: beaten repeatedly) steak that has been double dipped in flour/egg, pan fried until cooked through, and topped with creamy gravy you whipped up with the pan drippings. It's fork tender and A.MA.ZING. It should always {always!} be served with a big pile of creamy mashed potatoes that have also been topped with the gravy. And it's totally calorie free...
If you want step by step pictures, take a look at The Pioneer Woman's page. I'm way too scatterbrained to take pictures along the way :)
Chicken Fried Steak
2-3 pounds cube steak (it's already been tenderized)
Milk (you'll need 3-4 cups)
2 eggs
3 cups flour
Seasoned salt (I use Lawry's)
Fresh cracked black pepper
Vegetable or canola oil
Salt
In a shallow pan (I use pie pans), lightly beat the two eggs along with 1.5 cups of milk. In another shallow pan, mix together the flour, seasoning salt (just eyeball), and LOTS of pepper.
Heat enough oil to pan fry the meat in a large skillet over medium heat. Make sure it's the right temp by dropping a pinch of flour into the pan - they should sizzle and brown.
Working with one piece of meat at a time: season both sides of the meat with salt and pepper, dip into the egg/milk mixture, then into the flour mixture, turning to coat both sides. Now repeat! Egg dip and flour coating again. We're double dipping to get a nice breading on it.
Carefully add each piece to the hot pan and cook until golden brown around the edges, which should take a couple minutes or so per side. Don't overcrowd the pan and take your time.
*Some people like to bread all their pieces and then start frying but I hate standing there watching things fry so I bread additional pieces while others are being fried so I have something to do. Just know your hands will be covered in batter and you'll have to wash them repeatedly if you do it my way
Flip on the "keep warm" function on your oven and pull out a large baking sheet. As each piece finishes, carefully put it on the baking sheet and let it keep warm in the oven.
Once all the pieces are finished frying, you're going to whip up a skillet of gravy.
Sprinkle about 1/2 cup of flour over the leftover grease in your pan and whisk until it's fully combined. If it's still runny/greasy, add more flour. You want to create a nice paste out of the flour/grease combo.
Once you have a nice golden-brown paste, pour in about a cup of milk. Whisk, whisk, whisk. Whisk some more while you add some more milk. Cook 10 minutes or so until the gravy is smooth (no lumps of flour!) and the consistency you prefer. Don't hesitate to add more milk as needed.
Season well with lots of salt and pepper; taste and adjust as needed. You don't want a bland gravy!
Once your gravy is done, pull your steaks out of the oven and smother them (and your potatoes that I hope you made!) with the hot, creamy, delicious gravy.
Yum!
Tuesday, November 27, 2012
Yellow Squash Souffle
Earlier this month, we went on a 3 night getaway to Myrtle Beach. We only recently moved to this part of the country and Myrtle Beach was on my list of spots to visit. When I told Jason there were 120+ golf courses in that area, he was totally down for it, too.
One of the highlights was the drive through South Carolina. We never got on an interstate; instead, we drove on windy open roads through small towns past tons of cotton fields. For us Texans, we live on highways so this was a big change from our normal road trippin'!
On the way there, I spotted a farm that I wanted to stop at on the way back so we did. I was really hoping to load up on vegetables. Instead, I was pretty disappointed that they didn't have much fresh produce to speak of. They did, however, have yellow squash. So we bought some and brought it home.
Yellow squash is a favorite at our house but I tend to stick with the usual methods (grill/bake/boil). I was determined to try something new with our special South Carolina yellow squash!
I mentioned a few days ago that I picked up a new cookbook at Target and have been thumbing through it when planning our menus. Low and behold, she had a recipe for "My Grandmother's Yellow Squash Souffle."
If it's good enough for granny, it's good enough for me.
This is truly an old fashioned/church potluck dish. Except nothing is congealed or made with canned cream soup. It's warm, comforting, and brought back memories of tables lined with covered dishes at my childhood church home.
The ingredients aren't expensive, hard to find, or weird. The method is easy. The dish is delicious and goes with a multitude of main courses. Sometimes the old fashioned stuff isn't so bad :)
Yellow Squash Souffle
1 onion, chopped (she calls for sliced but I like them smaller)
3 to 4 medium yellow squash, sliced
2 cups crushed Ritz crackers
2 cups grated cheddar cheese
2 eggs
1 cup milk
sea salt and pepper
Preheat your oven to 350 and grease an 8x8 inch casserole dish.
Toss the onions and squash in a medium saucepan and cover just barely with water. Cover, turn the heat to medium-high, and when it boils, turn the heat down to a simmer. Simmer 10-15 minutes or until tender. Drain water out and leave the veggies in the pot.
Mix the cheese and cracker crumbs together, then scoop out 1.5 cups for the topping and set aside.
In a small bowl, lightly beat the eggs with the milk.
Add the cheese and crushed crackers to the squash and stir. Add the milk/eggs and a pinch of salt and pepper. Pour into your casserole dish, sprinkle with the crackers and cheese you set aside, and bake for 30-45 minutes or until set. Serve warm.
Source: Cowgirl Chef: Texas Cooking with a French Accent by Ellise Pierce
One of the highlights was the drive through South Carolina. We never got on an interstate; instead, we drove on windy open roads through small towns past tons of cotton fields. For us Texans, we live on highways so this was a big change from our normal road trippin'!
On the way there, I spotted a farm that I wanted to stop at on the way back so we did. I was really hoping to load up on vegetables. Instead, I was pretty disappointed that they didn't have much fresh produce to speak of. They did, however, have yellow squash. So we bought some and brought it home.
Yellow squash is a favorite at our house but I tend to stick with the usual methods (grill/bake/boil). I was determined to try something new with our special South Carolina yellow squash!
I mentioned a few days ago that I picked up a new cookbook at Target and have been thumbing through it when planning our menus. Low and behold, she had a recipe for "My Grandmother's Yellow Squash Souffle."
If it's good enough for granny, it's good enough for me.
This is truly an old fashioned/church potluck dish. Except nothing is congealed or made with canned cream soup. It's warm, comforting, and brought back memories of tables lined with covered dishes at my childhood church home.
The ingredients aren't expensive, hard to find, or weird. The method is easy. The dish is delicious and goes with a multitude of main courses. Sometimes the old fashioned stuff isn't so bad :)
Yellow Squash Souffle
1 onion, chopped (she calls for sliced but I like them smaller)
3 to 4 medium yellow squash, sliced
2 cups crushed Ritz crackers
2 cups grated cheddar cheese
2 eggs
1 cup milk
sea salt and pepper
Preheat your oven to 350 and grease an 8x8 inch casserole dish.
Toss the onions and squash in a medium saucepan and cover just barely with water. Cover, turn the heat to medium-high, and when it boils, turn the heat down to a simmer. Simmer 10-15 minutes or until tender. Drain water out and leave the veggies in the pot.
Mix the cheese and cracker crumbs together, then scoop out 1.5 cups for the topping and set aside.
In a small bowl, lightly beat the eggs with the milk.
Add the cheese and crushed crackers to the squash and stir. Add the milk/eggs and a pinch of salt and pepper. Pour into your casserole dish, sprinkle with the crackers and cheese you set aside, and bake for 30-45 minutes or until set. Serve warm.
Source: Cowgirl Chef: Texas Cooking with a French Accent by Ellise Pierce
Sunday, November 25, 2012
Black Bean, Roasted Zucchini, and Goat Cheese Enchiladas
Though I am very much a carnivore, I find myself more and more turned off by meat - especially cooking it. I think with the exception of bacon, I probably would be content eating meat free. Jason, however, would not be content. That said, he doesn't seem to mind meatless meals occasionally. It's not that he doesn't notice the absence of meat - believe me, he does - but meatless meals are usually so filling and satisfying that it's really not noticed once you're digging in.
We love enchiladas in this house and these combined three of my favorite foods - black beans, zucchini, and goat cheese. They are really delicious with bright, fresh flavors. And the meat wasn't even missed {we fought over the leftovers!}
Psst - if the multi-step process is intimidating, cheat and pick up some canned or bottled red enchilada sauce to use... though this sauce really was delicious!
Black Bean, Roasted Zucchini, and Goat Cheese Enchiladas
Enchiladas:
3 large zucchini, cut into ¼-inch dice
1 small onion, coarsely chopped
1 tablespoon extra virgin olive oil, divided
zest from 1 lemon
1 teaspoon kosher salt
1 (15-ounce) can black beans, rinsed and drained
5 ounces goat cheese, divided
12 corn tortillas
Sauce:
1 teaspoon canola oil
½ small onion, finely chopped
2 cloves garlic, minced
1½ tablespoons chili powder
½ tablespoon ground cumin
1 teaspoon sugar
¼ cup water
1 (8-ounce) can tomato sauce
black pepper, to taste
For serving:
2 avocados, diced
½ cup minced cilantro
lime wedges
Heat the oven to 450 degrees. On a large rimmed baking sheet, combine the zucchini, onion, oil, lemon zest, and salt. Roast, stirring occasionally, until the zucchini is softened and maybe slightly browned, about 30 minutes. Transfer to a large bowl; stir in the black beans and 4 ounces of goat cheese. Reduce the oven temperature to 350 degrees.
While the zucchini roasts, heat 1 teaspoon of canola oil in a medium saucepan over medium heat. Add the onion and cook until translucent and slightly browned around the edges, stirring occasionally, about 8 minutes. Add the garlic, chili powder, cumin, and sugar; cook, stirring constantly, until fragrant, about 1 minute. Add the water and tomato sauce. Increase the heat to medium-high, bring to a simmer, then reduce the heat to medium-low. Maintain a low simmer until slightly thickened, 5 to 10 minutes, stirring occasionally.
To soften the tortillas, brush or spray them with a light layer of oil. Arrange 6 tortillas in a single layer on a baking sheet; transfer to the oven and cook for about 3 minutes; flip the tortillas and continue baking for 2 more minutes, until the tortillas are pliable. Repeat with the remaining tortillas.
Spread a thin layer of sauce over the bottom of a 9-by-13-inch baking dish. Divide the filling evenly between the tortillas. Roll the tortillas over the filling, arranging the filled tortillas seam-side down in the baking dish. Cover the rolled tortillas with the remaining enchilada sauce. Sprinkle the remaining 1 ounce of goat cheese over the top of the sauce. Bake uncovered for 25-30 minutes, until the enchiladas are evenly heated.
Let set for 5 minutes before serving with chopped avocado, cilantro, and lime.
Source: The Way the Cookie Crumbles
We love enchiladas in this house and these combined three of my favorite foods - black beans, zucchini, and goat cheese. They are really delicious with bright, fresh flavors. And the meat wasn't even missed {we fought over the leftovers!}
Psst - if the multi-step process is intimidating, cheat and pick up some canned or bottled red enchilada sauce to use... though this sauce really was delicious!
Black Bean, Roasted Zucchini, and Goat Cheese Enchiladas
Enchiladas:
3 large zucchini, cut into ¼-inch dice
1 small onion, coarsely chopped
1 tablespoon extra virgin olive oil, divided
zest from 1 lemon
1 teaspoon kosher salt
1 (15-ounce) can black beans, rinsed and drained
5 ounces goat cheese, divided
12 corn tortillas
Sauce:
1 teaspoon canola oil
½ small onion, finely chopped
2 cloves garlic, minced
1½ tablespoons chili powder
½ tablespoon ground cumin
1 teaspoon sugar
¼ cup water
1 (8-ounce) can tomato sauce
black pepper, to taste
For serving:
2 avocados, diced
½ cup minced cilantro
lime wedges
Heat the oven to 450 degrees. On a large rimmed baking sheet, combine the zucchini, onion, oil, lemon zest, and salt. Roast, stirring occasionally, until the zucchini is softened and maybe slightly browned, about 30 minutes. Transfer to a large bowl; stir in the black beans and 4 ounces of goat cheese. Reduce the oven temperature to 350 degrees.
While the zucchini roasts, heat 1 teaspoon of canola oil in a medium saucepan over medium heat. Add the onion and cook until translucent and slightly browned around the edges, stirring occasionally, about 8 minutes. Add the garlic, chili powder, cumin, and sugar; cook, stirring constantly, until fragrant, about 1 minute. Add the water and tomato sauce. Increase the heat to medium-high, bring to a simmer, then reduce the heat to medium-low. Maintain a low simmer until slightly thickened, 5 to 10 minutes, stirring occasionally.
To soften the tortillas, brush or spray them with a light layer of oil. Arrange 6 tortillas in a single layer on a baking sheet; transfer to the oven and cook for about 3 minutes; flip the tortillas and continue baking for 2 more minutes, until the tortillas are pliable. Repeat with the remaining tortillas.
Spread a thin layer of sauce over the bottom of a 9-by-13-inch baking dish. Divide the filling evenly between the tortillas. Roll the tortillas over the filling, arranging the filled tortillas seam-side down in the baking dish. Cover the rolled tortillas with the remaining enchilada sauce. Sprinkle the remaining 1 ounce of goat cheese over the top of the sauce. Bake uncovered for 25-30 minutes, until the enchiladas are evenly heated.
Let set for 5 minutes before serving with chopped avocado, cilantro, and lime.
Source: The Way the Cookie Crumbles
Friday, November 23, 2012
Smokin' Chicken Tortilla Soup
A couple of months ago, I was enjoying my very first walk through Target post broken leg when I came across a clearance end cap. There are few things more exciting than a whole rack of items with red clearance stickers on them (can I get an amen?).
Mixed into this random mix of housewares was a cookbook, "Cowgirl Chef: Texas Cooking with a French Accent."
Texas? Cowgirl? How did I now know who this was?!
It had been marked down... and down again... from $25.00 to $12.50 and then again to $7.50.
I don't collect cookbooks (or even use them that often!) but this was TEXAS cooking - and it was pretty and small in it's layout.
So I bought it, brought it home, and promptly forgot about it.
I'm so glad I found it while cleaning a few days ago because it's a beautiful cookbook with lots of delicious sounding recipes that will be made at our house in the near future. For our first recipe, I went with the fall friendly tortilla soup. Her method was different than any I'd tried but it promised a thick and substantial soup - not a runny brothy soup.
We weren't disappointed!
To thicken the soup, you puree toasted tortillas right into it. It makes for a thick and hearty bowl of tortillay goodness. Add lots of roasted garlic and some rotisserie chicken and you've got yourself a meal!
Psst - the toasted tortilla strips are not optional. Please make them - they are perfect with this soup!
Smokin' Chicken Tortilla Soup
1 onion, cut into eight wedges
8 cloves of garlic, left in their skins
canola oil
6 corn tortillas
28 ounce can of whole tomatoes, and their juices
1 canned chipotle in adobo (if you like smoky spice; if not, omit)
4 cups chicken stock
sea salt and pepper
1 pound shredded cooked chicken
Toasty Tortilla Strips (see below)
1 avocado, chopped
a handful of fresh cilantro, chopped
1 lime, sliced into wedges
Preheat your broiler. Toss the onion pieces and the garlic cloves onto a foil lined baking sheet. Drizzle with a bit of oil and toss around with your hands. Broil until the onions char around the edges, about 10-15 minutes.
Put your tortillas directly on the rack directly beneath the onions and garlic and let them crisp. They should be done at the same time as the onions/garlic.
When cool enough to handle, squeeze the garlic out of its skins and toss into a blender along with the onions, crispy tortillas (torn into pieces), tomatoes, chipotle, stock, and a big pinch of salt and pepper. Puree until smooth then pour into a large soup pot. Turn the heat to medium, add the shredded chicken and give it a stir. Let this come to a boil, turn down the heat, and simmer for another 15-20 minutes.
Serve with a handful of Toasty Tortilla Strips, avocado, cilantro, shredded cheese, and lime on the side.
Toasty Tortilla Strips
8 corn tortillas
1 teaspoon chili powder
1/2 teaspoon sea salt
canola oil
Preheat oven to 450.
Slice the tortillas into strips about 1/2 inch wide. Toss them in a bowl with chile powder, sea salt, and a little canola oil. Mix with hands until all the strips are evenly coated.
Spread the strips on a baking sheet and bake until they're crispy, about 15 minutes (flipping about halfway).
Source: Cowgirl Chef: Texas Cooking with a French Accent by Ellise Pierce
Mixed into this random mix of housewares was a cookbook, "Cowgirl Chef: Texas Cooking with a French Accent."
Texas? Cowgirl? How did I now know who this was?!
It had been marked down... and down again... from $25.00 to $12.50 and then again to $7.50.
I don't collect cookbooks (or even use them that often!) but this was TEXAS cooking - and it was pretty and small in it's layout.
So I bought it, brought it home, and promptly forgot about it.
I'm so glad I found it while cleaning a few days ago because it's a beautiful cookbook with lots of delicious sounding recipes that will be made at our house in the near future. For our first recipe, I went with the fall friendly tortilla soup. Her method was different than any I'd tried but it promised a thick and substantial soup - not a runny brothy soup.
We weren't disappointed!
To thicken the soup, you puree toasted tortillas right into it. It makes for a thick and hearty bowl of tortillay goodness. Add lots of roasted garlic and some rotisserie chicken and you've got yourself a meal!
Psst - the toasted tortilla strips are not optional. Please make them - they are perfect with this soup!
Smokin' Chicken Tortilla Soup
1 onion, cut into eight wedges
8 cloves of garlic, left in their skins
canola oil
6 corn tortillas
28 ounce can of whole tomatoes, and their juices
1 canned chipotle in adobo (if you like smoky spice; if not, omit)
4 cups chicken stock
sea salt and pepper
1 pound shredded cooked chicken
Toasty Tortilla Strips (see below)
1 avocado, chopped
a handful of fresh cilantro, chopped
1 lime, sliced into wedges
Preheat your broiler. Toss the onion pieces and the garlic cloves onto a foil lined baking sheet. Drizzle with a bit of oil and toss around with your hands. Broil until the onions char around the edges, about 10-15 minutes.
Put your tortillas directly on the rack directly beneath the onions and garlic and let them crisp. They should be done at the same time as the onions/garlic.
When cool enough to handle, squeeze the garlic out of its skins and toss into a blender along with the onions, crispy tortillas (torn into pieces), tomatoes, chipotle, stock, and a big pinch of salt and pepper. Puree until smooth then pour into a large soup pot. Turn the heat to medium, add the shredded chicken and give it a stir. Let this come to a boil, turn down the heat, and simmer for another 15-20 minutes.
Serve with a handful of Toasty Tortilla Strips, avocado, cilantro, shredded cheese, and lime on the side.
Toasty Tortilla Strips
8 corn tortillas
1 teaspoon chili powder
1/2 teaspoon sea salt
canola oil
Preheat oven to 450.
Slice the tortillas into strips about 1/2 inch wide. Toss them in a bowl with chile powder, sea salt, and a little canola oil. Mix with hands until all the strips are evenly coated.
Spread the strips on a baking sheet and bake until they're crispy, about 15 minutes (flipping about halfway).
Source: Cowgirl Chef: Texas Cooking with a French Accent by Ellise Pierce
Subscribe to:
Posts
(
Atom
)