Tuesday, May 26, 2015

Grilled Chicken with Creamy Lemon Goat Cheese Orzo


This tangy orzo is super creamy, thanks to the Greek yogurt and goat cheese. When paired with flavorful grilled chicken and fresh herbs, it's perfect for a healthy spring dinner!

If you love goat cheese, you will love this dish! Goat cheese is creamy, tangy, relatively low calorie and perfect paired with orzo pasta. A little goes a long way; those 2 ounces provide a ton of flavor!

We loved this dinner, especially since it was easy and weeknight friendly. However, if you aren't a fan of tangy food (or goat cheese) you may not love it. For the rest of us, it's the perfect weeknight dinner!


Grilled Chicken with Creamy Lemon Goat Cheese Orzo
1/4 cup plain Greek yogurt, room temp
1 tablespoon olive oil, divided
1 large garlic clove, minced
1 tablespoon fresh lemon juice + zest of 1 lemon
1 cup orzo
1 lb boneless/skinless chicken breasts
2 ounces finely crumbled goat cheese, room temp
4 tablespoons chopped fresh herbs, such as basil and thyme
salt and freshly ground pepper

Bring a large pot of water to a boil and preheat a grill to medium heat.

In a medium bowl, whisk together the yogurt, 2 teaspoons oil, garlic, lemon juice, and 1/2 teaspoon each salt and pepper. Set aside.

Add the orzo to the boiling water and cook according to package directions for al dente. Drain, reserving 1 cup of the cooking water. 

Rub the chicken with 1 teaspoon oil and sprinkle with salt and pepper. Grill until well marked and cooked through, about 10-12 minutes a side. Transfer to a cutting board and let rest.

Meanwhile, stir the drained orzo into the reserved yogurt mixture along with the goat cheese, 3 tablespoons of fresh herbs, and at least 3/4 cup pasta water until well combined. Add more pasta water if needed to achieve preferred creaminess. Transfer the orzo to a serving platter.

Thinly slice the chicken and arrange on top of the orzo. Sprinkle with lemon zest and remaining 1 tablespoons herbs. 

Source: adapted from Food Network

Tuesday, May 19, 2015

Eleven 30-Minute-or-Less Boneless Chicken Breast Recipes


Always on the hunt for a fresh way to (quickly) cook boneless/skinless chicken breasts? Me too! I collected 11 of our FAVORITE recipes that call for them, and they are all done in 30 minutes or less! There are no boring chicken recipes here :)

Happy cooking!


Blackened Chicken and Cilantro-Lime Quinoa

Monday, May 18, 2015

Creamy Skillet Corn


This corn is the best of both worlds! Creamy, yet the corn still retains it's crisp texture. This buttery side may be your new family favorite!

I get so excited when spring produce starts showing up in the grocery store. Butternut squash and pumpkins are nice and all but I am all about the fruits and vegetables that spring and summer bring. While I love throwing them on the grill this time of year, there is nothing like serving up fresh veggies straight from the cast iron skillet.

This corn isn't done quickly but it's almost completely hands off cooking. Get it started then work on your main course; it'll happily simmer on your stove while you work on other things.

This is perfect with burgers, ribs, or grilled chicken - or you can double up the amount and serve it at your next picnic!


Creamy Skillet Corn
6 ears corn
3 tablespoons all-purpose flour
2 teaspoons sugar
1 teaspoon salt
1/2-1 teaspoon fresh ground pepper
1.5 cups water
3 tablespoons butter

Shuck the corn, pull off the silks, and rinse under running water. Use a sharp knife and cut the corn from the cob, collecting it in a large bowl. Scrape the cob with a spoon to collect the milk.

In a bowl, whisk together the flour, sugar, salt, pepper, and water. Set aside.

Melt the butter over medium-low heat in a large cast iron skillet. Once melted, add the corn and flour mixture; stir well. Continue to cook over medium-low for 40-45 minutes, stirring occasionally.

Before serving, taste and adjust salt and pepper if needed (we like lots of pepper!).

Source: adapted from Kevin & Amanda

Monday, May 11, 2015

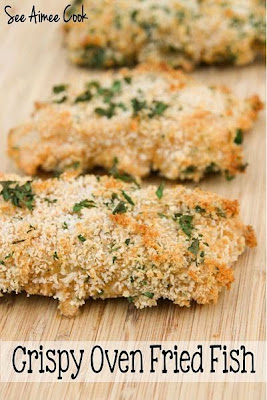
Crispy Oven Fried Fish


Crispy fish without the mess and calories of frying!

Just a few weeks ago, we visited London and Dublin for the first time. Both cities were not lacking in fish 'n chips! We ate it several times while on the trip, remembering just how delicious good fried fish can be.

Back at home, I'm not keen on trying to recreate our fried fish adventures because of the sheer mess involved. But I do love crispy fish! This recipe promises super crispy fish, but made in the oven! A simple breading of panko and herbs is well coated then placed on a rack. The rack is key in making sure you get a super crispy breading.

You can either use panko or make your own breadcrumbs. Store bought breadcrumbs are not quite coarse enough to get the best texture.


Crispy Oven Fried Fish
1 cup panko breadcrumbs (see note above)
2 tablespoons minced fresh parsley
1 small shallot, minced
1/2 cup all-purpose flour
2 large eggs
3 tablespoons light mayonnaise
1/2 teaspoon paprika
1/4 teaspoon cayenne pepper
4 (6-ounce) firm white fish fillets (like cod or haddock) 1-1 1/2 inches thick
lemon wedges, for serving

Preheat oven to 425 and generously coat a wire rack with cooking spray. Place the rack over a baking sheet.

Combine the panko, parsley, and shallot in a shallow bowl. Place 3 tablespoons of flour into another shallow dish. In a third shallow dish, whisk together the eggs, mayonnaise, paprika, cayenne and 1/4 teaspoon pepper together. To the egg dish, whisk in the remaining flour until a smooth, thick batter is formed.

Pat each piece of fish completely dry with a paper towel and season with salt and pepper. Working with one piece of fish at a time, dredge into the flour, then dip it into egg batter, and finally coat it with the bread crumbs, pressing to adhere. Lay the breaded fish on the prepared wire rack. Repeat until all pieces are coated.

Bake the fish until the coating is golden and it flakes easily when gently poked with a fork, about 18-25 minutes. Keep an eye on it if it's thinner.

Gently transfer the fish to individuals plates and serve with lemon wedges.

Source: adapted from Gourmet: Day to Day

Saturday, May 9, 2015

PF Chang Copycat Mongolian Beef


This salty/sweet beef dish is a favorite at PF Changs - and many other Chinese-American restaurants - and this one-pan copycat recipe is spot on! Save yourself the time (and big bucks) and make it at home instead!

I adore Chinese-American cuisine, and PF Changs is one of those restaurants that serves up consistently good versions of all my favorites. Right on the top of the list is Mongolian beef. It's sweet and savory, and the tender beef can be eaten like candy! Since PF Changs always has a long wait for a table, I love being able to whip up my favorite at home instead. Not having to change out of my yoga pants is a bonus!

This version takes around 30 minutes to whip up and uses pantry items that you likely already have on hand. Steam a pot of rice and you have a take-out quality meal on the table in no time.


Mongolian Beef
For the beef:
2 lb flank steak, thinly sliced against the grain
1/2 cup cornstarch
1/2 cup vegetable oil
For the sauce:
3 teaspoons vegetable oil
1 teaspoon grated fresh ginger
4 large garlic cloves, minced
1 cup water
1 cup soy sauce
1 cup brown sugar
Green onions, thinly sliced

In a large ziplock bag, combine the sliced beef and cornstarch. Seal and shake to coat the pieces. 

Heat 3 teaspoons oil in a large skillet or wok over medium heat. Add the ginger and garlic then immediately add the water, soy sauce, and brown sugar; stir well. Cook about 2 minutes then transfer to a bowl.

Increase the heat and add 1/2 cup vegetable oil. Once hot, add the beef pieces and cook until browned, working in batches if needed. Pour the reserved sauce in the pan alongside the beef. Shake the remaining cornstarch from the ziplock bag into the pan. Let cook until thickened to your liking.

Sprinkle with green onions before serving.

Source: adapted from Pink Bites

Tuesday, May 5, 2015

Chiles Rellenos Casserole


Traditional roasted chile flavor, hearty filling, and crisp fried shell flavor without all the work! This Tex-Mex casserole is perfect for Cinco de Mayo!

Happy Cinco de Mayo! Are you celebrating today with Mexican food? We eat Mexican food (read: Tex Mex) a lot at our house so any excuse to enjoy it is good with us!

Chile rellenos is a popular Mexican dish. Traditionally, a poblano pepper is roasted, stuffed, dipped in an egg based batter, and fried. It's cheesy, creamy, and has a delicious crispy "shell" around it. Stuffing and frying individual peppers at home can be a drag so this recipe feeds your craving without all the work!

Browned lean beef is mixed with poblano peppers, tomatoes, and spices before being layered in a casserole dish with heaps of cheese. You whip up a simple egg batter to layer on top then bake!


Chiles Rellenos Casserole
1 tablespoon vegetable oil
1 onion, finely chopped
2 pounds 90% lean ground beef
4 poblano chiles, stemmed, seeded, and chopped
2 garlic cloves, minced
2 teaspoons ground cumin
1 teaspoon ground oregano
1/4 teaspoon cayenne pepper
1 (10 ounce) can diced tomatoes and green chilies, drained (such as Rotel brand)
2.5 cups Monterey Jack cheese, shredded
1/2 cup flour
3/4 cup milk
2 large egg whites
salt and pepper

Adjust an oven rack to upper-middle position and preheat oven to 450.

Heat oil in a large skillet over medium heat. Add onion and cook until softened, about 5 minutes. Add the beef and cook, breaking up meat with wooden spoon, until cooked through and no longer pink, about 8-10 minutes. Use a slotted spoon and transfer beef mixture to a paper towel lined plate. 

Pour off all but 2 tablespoons fat left in skillet, add poblanos, and cook over medium-high heat until browned, about 8-10 minutes. Stir in beef mixture, garlic, cumin, oregano, cayenne, salt, and pepper. Cook until fragrant, about 30 seconds. Stir in drained tomatoes and cook until the beef mixture is dry, about 1 minute. Remove from heat and stir in 2 cups cheese. Transfer mixture to a 9x13 baking dish and press into an even layer.

Combine flour, 1/2 teaspoon salt, and 1/4 teaspoon pepper in a large bowl. Slowly whisk in milk until smooth; set aside. In a second bowl, add the egg whites. Using a mixer fitted with a whisk, whip egg whites on medium-low until foamy, about 1 minute. Increase speed to medium-high and whip until stiff peaks form, about 3 minutes. Whisk 1/3 of the whipped egg whites into the flour mixture, then gently fold in remaining egg whites until combined.

Pour batter over beef mixture. Bake until topping is light golden and puffed, about 15 minutes. Sprinkle with remaining 1/2 cup cheese and continue to bake until golden brown, about 10 minutes. Let casserole cool for 10 minutes before serving.

Source: America's Test Kitchen

Sunday, May 3, 2015

(Lightened Up) Cheesecake Factory Louisiana Chicken Pasta


Even better than the original! This creamy chicken pasta is bursting with Cajun flavor that can easily be adjusted to suit your taste. It'll quickly become a new family favorite!

Cheesecake Factory and their novel sized menu is not known for being healthy. Instead, they are known for huge portions, delicious food, and cheesecake! While lots of their dishes are popular, the Louisiana Chicken Pasta is one of the most popular - and for good reason! It's creamy, a tad spicy, and downright sinful.

The original calls for deep frying the chicken. Delicious? Yes! But messy for a home cook to make and loaded with calories. This version is (very) lightened up compared to the original but please don't think that means this version is health food - it's not - but it's definitely splurge worthy!

Dare I say it's better than the original version?

I hesitated from making this recipe years ago due to my fear of spice. I scaled back the cayenne a tad but really found it to be perfect. Feel free to adjust to your taste!


Louisiana Chicken Pasta
For the chicken:
2 boneless/skinless chicken breasts, cut into bite-sized pieces
Salt and pepper
Cajun seasoning

For the pasta:
8 oz. bowtie pasta
Kosher salt 

For the sauce:
1 tbsp. butter
1 tbsp. olive oil
1 red bell pepper, seeded and thinly sliced
1/4 cup chopped yellow onion
3/4 tsp. kosher salt
Freshly ground black pepper, to taste
1/4 tsp. garlic powder
1/2 tsp. Cajun seasoning
1/4 tsp. ground cayenne pepper
1.5 cups half-and-half
1 tbsp. cornstarch
1 tbsp. water 
3 scallions, chopped 

Bring a pot of salted water to boil. Cook the pasta according to package directions. Drain the cooked pasta and set aside.

Heat a small amount of butter or olive oil in a large skillet over medium-high heat. Season the chicken pieces with salt, pepper, and a generous sprinkle of Cajun seasoning. Add to the skillet and cook until lightly browned and cooked through. Transfer to a plate and set aside.

Return the skillet to medium heat and heat 1 tablespoon butter and 1 tablespoon olive oil until the butter has melted. Add the bell pepper, onion, salt, pepper, Cajun seasoning, and cayenne pepper to the pan. Cook until the vegetables are tender, about 6-8 minutes. Add the half-and-half and bring to a simmer. 

In a small bowl, whisk together the cornstarch and water and add to the skillet once the cream mixture has started to bubble. Allow to cook until thickened, about 5 minutes.

When the sauce has thickened, add the cooked pasta and chicken pieces to the pan. Stir well to combine and cook at medium-low heat just until the chicken is warmed through. 

Adjust the amount of Cajun seasoning if necessary to suit your tastes. Stir in the scallions. Serve immediately and top with additional Cajun seasoning, if desired.

Source: adapted from Annie's Eats


See Aimee Cook


Follow on Bloglovin

Designed by:

Munchkin Land Designs Elements by Amy Teets
I was featured, I was Featured by Addicted to Recipes
What's cooking, love?
Lil\'Luna
Mandy's Recipe Box
 
Designed by Munchkin Land Designs • Copyright 2012 • All Rights Reserved