Tuesday, March 27, 2012

All-American Meatloaf

I think meatloaf gets a bad rap. Of course the name doesn't help its image for sure... anything labeled simply "meat" grosses me out and then you add loaf to it and there is no wonder why people curl their nose up at it! But I'm here to proudly announce that I enjoy meatloaf. I always loved my momma's meatloaf growing up - it was true comfort food. To this day, meatloaf *has* to have mashed potatoes alongside it since that was how she served it.

This meatloaf recipe comes from the March Cooking Light magazine; they actually did an entire section of meatloaf recipes and I hope to try a few more. This one, however, looked especially delicious to me so it was first on the list.

This recipe is a fairly traditional one but the twist (at least from the versions I've made/had) is the addition of cheese cubes and buttermilk. The cheese melts into pockets of ooey goodness. I also loved the flavor twist that the buttermilk lended. It was flavorful, easy to throw together, and a big hit. Leftovers didn't last long in this house!

Note: I didn't use a loaf pan but instead formed it into a similar size and put it on a baking sheet. I like the crispy edges (esp with the gooey cheese) that a baking sheet can give.

All-American Meatloaf
1 1/2 ounces French bread, torn into pieces *I used panko
1/2 cup ketchup, divided
1 cup coarsely chopped onion (I left out)
5 tablespoons chopped fresh flat-leaf parsley, divided
1/4 cup nonfat buttermilk
1 tablespoon minced fresh garlic (about 3 cloves)
1 tablespoon Dijon mustard
1/2 teaspoon freshly ground black pepper
1/4 teaspoon kosher salt
2 ounces sharp cheddar cheese
2 large eggs, lightly beaten
1 pound ground sirloin
Cooking spray

Preheat oven to 350°.

Place bread in a food processor; pulse 10 times or until coarse crumbs measure 1 cup. Arrange breadcrumbs in an even layer on a baking sheet. Bake at 350° for 6 minutes or until lightly toasted; cool. (I used panko to save a step)

Combine toasted breadcrumbs, 1/4 cup ketchup, onion, 3 tablespoons parsley, and remaining ingredients except cooking spray in a bowl; gently mix until just combined.

Transfer the mixture to a 9 x 5–inch loaf pan coated with cooking spray; do not pack. Bake at 350° for 30 minutes. Brush top of loaf with remaining 1/4 cup ketchup. Bake an additional 25 minutes or until thermometer registers 160°. Let stand for 10 minutes, and cut into 6 slices. Sprinkle with remaining parsley.

Monday, March 26, 2012

Chicken Tamale Pie

I'll be honest; I wasn't sure I'd like this dish. You see, it calls for more canned foods than I typically use in a week's time... and I admit to being a bit of a snob when it comes to things from the canned food aisle. But, a blog I love featured it and said it was delish so I had to give it a shot. Plus, Jason is a fan of 1) food in a can and 2) anything mexican.

She was right - it's delicious!

I tweaked the original recipe a bit since it seemed super spicy as written with an entire can of chopped green chiles and it ended up perfect for our tastes. If you have kids eating it, I'd choose a mild enchilada sauce, eliminate the red pepper, and cut back on the chiles. I also missed the message that I needed cooked, shredded chicken so instead I diced chicken breasts and browned them on the stovetop with the taco seasoning while the cornbread baked. It ended up making the pie a bit chunkier but delicious nonetheless.

This is easy, inexpensive, and a crowd pleaser. Even if you're a canned food snob like myself I hope you give it a shot!

Chicken Tamale Pie
1/3 cup milk
1/4 cup egg substitute or two lightly beaten large eggs
1 1/2 tablespoon taco seasoning, divided - make your own in 1 minute!
1/4 teaspoon ground red pepper (optional)
1 (14 3/4 ounce) can cream-style corn
1 (8.5 ounce) box corn muffin mix (such as Jiffy)
1 (4 ounce) can chopped green chiles, drained (I used half)
1 (10 ounce) can red enchilada sauce
2 cups shredded cooked chicken breast
3/4 cup shredded cheese (I used cheddar - a Mexican blend would be great)
Cilantro for topping

Preheat oven to 400°.

Combine the first 7 ingredients (milk through green chiles), using just 1/2 tablespoon of the taco seasoning, in a large bowl, stirring just until moist. Pour mixture into a round pie plate coated with cooking spray.

Bake at 400° for 15 minutes. While corn is baking, toss the chicken in the remaining 1 tablespoon taco seasoning. When corn is done – it will be just barely set and golden brown – pierce entire surface liberally with a fork. Pour enchilada sauce over top. Top with chicken; sprinkle with cheese. Bake at 400° for 15 minutes or until cheese melts. Remove from oven; let stand 5 minutes. Cut into 8 pieces; top each serving with cilantro.

Source: Pinch of Yum

Saturday, March 24, 2012

Ropa Vieja {Crockpot}

I've always wanted to visit Cuba. Mostly because I'm not allowed to go... but also because it's not as Americanized as many other countries and I'd love to visit a place like that. Wthout going halfway around the world. While I hope the travel restrictions change during my lifetime, or I figure out some way to get myself there, I'll start now by just enjoying Cuban cuisine. Like this dish.

This traditionally Cuban dish is incredibly delicious, easy to make, and versatile! I happily ate mine over rice (I'm a total rice junkie.) but Jason went straight for the fresh made tortillas to make soft tacos (and there may just been quite a bit of cheese sprinkled over top of his...). It's similar to a traditional brisket but with a different flavor profile.

We both loved it and it made a TON that was easily to use over the next few days in a variety of ways. The crockpot makes it a super simple meal that you can pull together after walking in the door after a long day.

Ropa Vieja
2 lb beef brisket, top sirloin, or other roast
1 sweet vidalia onion, diced small
1 small can (3 ounce) pimentos morrones, fire roasted peeled pimentos diced
20 small pitted pimento stuffed green olives drained of the brine
8 clove fresh garlic smashed or put through a garlic press
1/4 c diced fresh curly parsley, try not to add the stems
2 bay leaves
1 tsp dried oregano
1 tsp ground cumin
2 Tbsp apple vinegar
3 ounces tomato paste
1 small packet sazon goya seasoning with culantro and achiote
3 sprig(s) fresh cilantro diced
1/4 c tomato ketchup
1 tsp worcestershire sauce
1/2 c – 1 c beef brisket broth (reserved after slow cooking)
1 lime, sliced for serving

Add all ingredients to a slow cooker and cook on low for 10 hours.

Remove cooked meat from slow cooker and shred. Strain pimentos and olives from beef broth and mix back in with shredded meat. Moisten shredded meat with reserved cooking liquid to desired consistency, if needed.

Source: Branny Boils Over

Friday, March 23, 2012

Fried Tuna Po Boy

I grew up eating tuna salad sandwiches and still love making one occasionally. These fried tuna balls were so intriguing I just had to give them a shot. I've always loved a tuna melt so why not? You make a very basic tuna salad, roll it into balls and bread in panko/bread crumbs, and deep fry for just a few minutes. The result is a ridiculously addicting crunchy exterior and a warm, creamy, tasty inside.

Psst - this is also a 30 minutes or less meal. Score!

Fried Tuna Po Boy - makes 2 sandwiches
2 cans tuna, drained
2 green onions, sliced
1 egg
1 tablespoon mayonnaise
1 teaspoon Worcestershire sauce
1 teaspoon dijon mustard
1 teaspoon creole seasoning
Oil for frying
1 cup bread crumbs or panko
Baguette, hoagie, or other roll, sliced in half 
Lettuce
Remoulade sauce (see recipe below)

Mix the tuna, green onions, egg, mayonnaise, Worcestershire sauce, mustard, and cajun seasoning along with enough bread crumbs that the mixture holds together well.

Heat 1/2 inch on oil in a saucepan over medium heat.

Form the mixture into 1 1/2 inch balls and roll them in the bread crumbs to coat.

Fry the tuna balls in oil until golden brown on all sides and set aside on paper towels to drain.

Assemble sandwich and enjoy.


Remoulade Sauce
1/4 cup mayonnaise
1 tablespoon creole mustard
1 tablespoon ketchup
1 teaspoon horseradish
1 small clove garlic
1 tablespoon lemon juice
1 teaspoon capers
1 green onion (chopped)
1/4 teaspoon cayenne pepper
1/4 teaspoon paprika
hot sauce to taste

Blend everything in a food processor until smooth.

Wednesday, March 14, 2012

Skillet BBQ Chicken Pasta

You know how people often say 'it's a one pot meal' but they don't account for the pasta... or rice... or some other element that you have to make in order for it to be a complete meal?

This isn't one of them. Literally, one pot = one pot. Even the pasta!

Since we handwash all our pots/pans, one pot is a big plus in our house.

We like big flavor (esp Jason) so I tasted and added BBQ sauce and sour cream until the flavor was our preference. So, be sure and have more on hand and do a taste test near the end.

This is a great, family friendly weeknight meal. Definitely a keeper!

Skillet BBQ Chicken Pasta
1 tablespoon extra-virgin olive oil
2 boneless skinless chicken breasts, cut into bite-size chunks
1 onion, diced
3 cups water
2 1/2 cups chicken broth
1/2 teaspoon salt
12 ounces penne pasta
1 cup barbecue sauce
1/3 cup sour cream or Greek yogurt
1 cup shredded sharp cheddar cheese

In a large 12-inch nonstick skillet heat the olive oil over medium heat. When hot, add the chicken and onions and saute, stirring occasionally, until the chicken is browned and cooked through. Remove the chicken and onions to a plate and set aside.

In the same skillet, add the water, chicken broth, penne and salt. Bring to a boil and simmer for 12 to 15 minutes, until the liquid is almost absorbed, the pasta is tender and the mixture is thick and syrupy. *Note: I ended up with tons of extra liquid even with the pasta cooked so I removed the excess and set it aside in case it needed thinned out later.

Stir in the barbecue sauce and sour cream. Once mixed, add in the reserved chicken, onions and shredded cheese. Stir to combine and cook until everything is heated through.

Taste and season with salt and pepper, if needed. Garnish with green onions and more shredded cheese.

Source: A Taste of Home Cooking

Tuesday, March 13, 2012

Mushroom Crusted Turkey Burgers

A few years ago, I made mushroom crusted filets that were divine... so when I saw a twist on that, in a burger form, I knew I had to give it a shot. These were delicious! The mushroom gives an earthiness to the burger and, I think, holds in the moisture better. Though I may just be making that part up, I do know that these turkey burgers were not dry at all - which is often the case when you swap beef for turkey.

I'm sure you could grill these (they hold together fairly well) but since it was raining, I reached for my handy dandy cast iron skillet to get a great sear on it. Either way you cook it, I think you'll be pleasantly surprised at how easy and delicious these turned out.

PSA: Don't attempt to grind your dried mushrooms in your mini chopper like I did. It nearly killed my machine. Go for the food processor and save yourself the headache (though a coffee bean grinder might work!)

Mushroom Crusted Turkey Burgers
1 oz dried mushrooms
1/4 tsp kosher salt
1/8 tsp ground black pepper
1 1/4 lbs ground turkey
1 scallion, minced
2 Tbs minced fresh parsley
1 tsp Dijon mustard
1 tsp Worcestershire sauce
2 Tbs oil
4 slices Havarti cheese
4 burger buns, split
arugula, for serving (we used spinach instead)

In the bowl of a food processor, grind the dried mushrooms until they are a coarse powder. Reserve 2 teaspoons of the powder, and transfer the rest to a shallow bowl or pie plate and mix in the salt and pepper.

In a large bowl, combine the turkey, reserved mushroom powder, scallion, parsley, mustard, and Worcestershire sauce. Season with salt and pepper to taste. Form into 4 equal-sized patties.

Preheat a large skillet over medium heat, and add the oil.

Working one burger at a time, coat the outside with the mushroom powder, pressing lightly to adhere.

Cook the burgers 4-5 minutes per side, or until the meat is cooked through. Add the cheese for the last minute or two, and continue cooking until it has melted.

Toast the buns and serve the burgers topped with arugula.

Source: Pink Parsley

Monday, March 12, 2012

Crispy Oven Fried Fish

(this pic is pre-new camera. obviously.)

Crispy fish without the mess and calories of frying! The key is this great batter and baking it on a rack. We both found this recipe very flavorful, crispy, and delicious.

If you make your breadcrumbs the night before, you could easily whip this together after a day at the office and have dinner on the table in no time. I can't imagine how anyone would turn their nose up to this great dish.

*My fish was thinner so I just watched it carefully to avoid overcooking

Crispy Oven Fried Fish
4 slices whole-wheat sandwich bread, torn into 1-inch pieces
1 tablespoon canola oil
salt and pepper
2 tablespoons minced fresh parsley
1 small shallot, minced
1/2 cup all-purpose flour
2 large eggs
3 tablespoons light mayonnaise
1/2 teaspoon paprika
1/4 teaspoon cayenne pepper
4 (6-ounce) firm white fish fillets (like cod or haddock) 1-1 1/2 inches thick
lemon wedges, for serving

Adjust the oven rack to the middle position and heat oven to 350 degrees. Pulse the bread in a food processor until coarse crumbs form (about 10 pulses). Transfer the crumbs to a baking sheet and stir in the oil, 1/4 teaspoon salt & pepper, each. Spread the crumbs over the baking sheet and bake, stirring occasionally, until golden brown and dry (about 10-12 minutes)

Remove the crumbs from the oven and set aside to cool for about 15 minutes. Increase the oven temperature to 425 degrees and spray a wire rack with vegetable oil spray well. Place the rack over a baking sheet.

Transfer the cooled crumbs into a shallow bowl and mix in the parsley and shallot. Spread 3 tablespoons of flour into another shallow dish. In a third shallow dish, whisk together the eggs, mayonnaise, paprika, cayenne and 1/4 teaspoon pepper together. Then whisk in the remaining flour until a smooth, thick batter is formed.

Pat each piece of fish completely dry with a paper towel and season with salt and pepper. Working on one fish at a time, dredge into the flour, then dip it into egg batter and finally coat it with the bread crumbs, pressing on each piece to adhere. Lay the breaded fish on the prepared wire rack.

Bake the fish until the coating is golden and the fish flakes easily when gently poked with a fork, about 18-25 minutes. Keep an eye on it if it's thinner.

Gently transfer the fish to individuals plates and serve with lemon wedges.

Source: Gourmet: Day to Day

Saturday, March 10, 2012

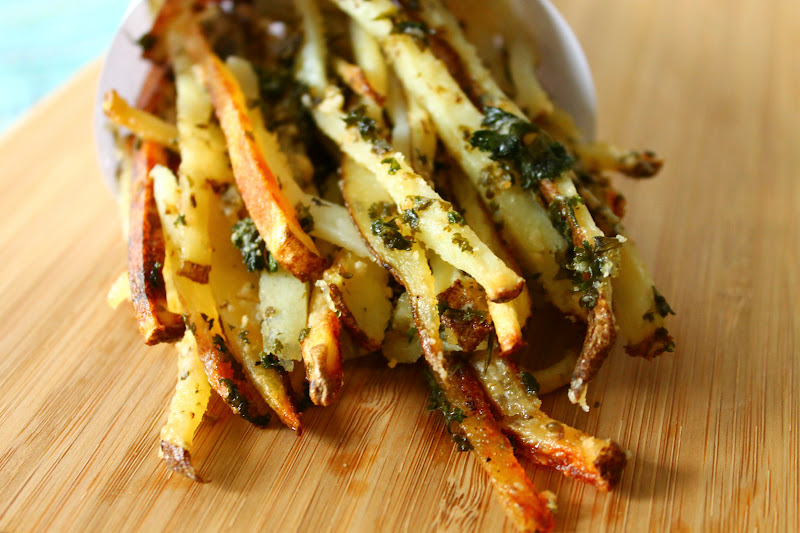
Italian Fries {oven baked}

Aimee got a new camera.
I've wanted a DSLR for years so when a great deal came along, Jason urged me to 'just buy it'

(I think he has grown tired of hearing me rant about taking food pics with a basic p&s)


These are my first attempts at taking food pics using the new camera and while I know I have a lot to learn, I'm already so darn proud of how they look. Especially in comparison to my usual pics!


But enough about my camera. Let's talk about these fries! An Italian twist on the French fry, these babies are easy, versatile, and TASTY! We had a hard time restraining ourselves to not eat the entire baking sheet. They are very flavorful and the cheese forms a salty crust on top. Um, yum!

(psst - these also warm up in the microwave well, which is unusual for fries!)

You could swap out the Italian flavorings for something else - maybe cilantro, cumin, monterey jack for a Tex Mex inspired fry? Possibilities are endless!

*I used 2 large Russets, didn't bother peeling, and it made just one large baking sheet worth. I may have sliced mine thinner - as I love shoestring potatoes - so I just kept an eye on them to avoid burning

Italian Fries
6 or 7 Idaho potatoes, peeled and sliced into 1/3-inch-thick French fry-style strips, soaked in cold water (to avoid browning)
4 tablespoons (1/4 cup) extra-virgin olive oil
1 tablespoon dried Italian herbs or some combo of dried oregano, thyme, marjoram, and basil
2 cups freshly grated Romano cheese
1/4 cup parsley leaves, finely chopped
4 tablespoons (1/2 stick) salted butter, cut into 6 cubes
Coarse salt and freshly ground black pepper

Preheat the oven to 400 degrees.

Drain the potatoes and pat dry with paper towels. Spread 1 tablespoon of the olive oil on each of 2 rimmed baking sheets and spread out the potatoes. Overlapping is fine.

Sprinkle the dried herbs evenly over the potatoes. Liberally spread the cheese and parsley on top. Drizzle the remaining 2 tablespoons of olive oil over the cheese. Scatter the cubed butter around the pans.

Bake until the potatoes are golden brown, rotating the pans after 30 minutes, for 45 to 50 minutes total. Use a spatula to lift off the potatoes with all the crusty cheese adhered to them. Sprinkle with salt and pepper to taste. Serve hot.

Thursday, March 8, 2012

Roasted Acorn Squash with Ricotta & Honey

This is divine. For reals. The flavor combination is darn near perfect and a sinfully delicious way to enjoy one of my favorite winter squashes. It's so simple it's ridiculous.

You should make it before the squash season ends!

Roasted Acorn Squash with Ricotta and Honey
2 acorn squash
Olive Oil
Salt and fresh ground pepper
10 oz fresh ricotta
2-4 tablespoons honey
Ground nutmeg (fresh or dried)

Preheat oven to 400˚ F.

Cut squash in half, remove seeds, then cut each piece in ½ for a total of 8 wedges. Leave the skin on.

Place squash on roasting pan, baking sheet, or cast iron skillet and coat with olive oil, salt, and pepper.

Roast in oven for 45-50 minutes until soft and toasty.

Let cool slightly, spoon on a dollop of ricotta or chunk of buratta, drizzle with honey and sprinkle on nutmeg. Serve immediately.

Source: Matt Bites

Wednesday, March 7, 2012

Easy Shredded Chicken & Homemade Chicken Broth

It seems like I use a ton of chicken broth and it gets pricey really quickly. When I needed some shredded chicken for Chicken Marsala Casserole I opted to skip the pricier rotisserie chicken and opt for a whole chicken to cook myself.

Since I wasn't serving the chicken as a meal (but instead using the meat in a recipe) I knew I didn't want it overly seasoned. If you want to serve yours as a meal, feel free to season the heck out of it. Not only did I get a great amount of useable chicken, I also was able to use the leftover pieces to make chicken broth!

Easy Shredded Chicken
1 whole chicken, innards removed
Cooking spray
Seasonings, if desired

Spray the crockpot with cooking spray so it won't stick. Place the entire chicken in the crockpot, no additional liquid needed. Sprinkle on any seasonings you'd like (optional).

Cook it on low for 7 hours or so.

Remove the chicken and pull off all the useable meat (I use a fork). Don't pour out the liquid in the crockpot because if you want to make broth...


Homemade Chicken Broth
Bones, skin, etc of whole chicken
Five cups of water
Liquid already in the crockpot

Put the bones, skin, etc that you don't want from the chicken back in the crockpot and pour about 5 cups of water over top. Set it to low and get it cook all night/day long (I let it run about 10 hours).

Strain it and place the liquid in the fridge to cool completely. Scrape the layer of fat off the top and pour the remaining broth into smaller containers to freeze or refrigerate. I filled 5 pint sized jars and still had leftover! Some more adventurous than me would probably even find a use for the fat.


My $4 chicken provided enough meat for 3-4 meals plus tons of chicken broth. What a deal!

Tuesday, March 6, 2012

Bacon and Butternut Squash Pasta

I apologize for the lack of posts - I went out of town last week to the lovely city of Norfolk, Virginia where I got to spend time with friends, attend a great conference, and eat lots of seafood! Now that I'm back in town, I have a backlog of posts that I'm excited to share with you this week!

This season, I have really latched onto butternut squash. It's by far one of my favorite winter vegetables and I can't seem to get enough of it! Costco, thankfully, sells two pound packages of already peeled and cubed butternut squash for just $3.99. Not only is it inexpensive, I don't have to risk cutting my fingers off when dicing my own!

This recipe, from Cooking Light, seems complicated and time consuming - and it is somewhat time consuming - but it's totally worth it. It's sweet, salty, creamy, and nutty all at once. Plus it makes a large quantity!

You can easily make it vegetarian by omitting the bacon and using vegetable broth. You could also use mustard greens or Swiss chard instead of the kale. I would not, however, recommend spinach as it's not as hearty.

*Money saving tip: stop by your deli for a thick piece of Gruyere to shred instead of investing in a large piece

Bacon and Butternut Squash Pasta
5 cups (1/2-inch) cubed peeled butternut squash (I used a full 2 pound package)
1 tablespoon olive oil
Cooking spray
12 ounces uncooked ziti or other short pasta
4 cups chopped kale
2 bacon slices (I used 4)
2 cups vertically sliced onion (I used chopped)
Salt and pepper
5 garlic cloves, minced
2 cups fat-free, lower-sodium chicken broth
2 tablespoons all-purpose flour
1/2 teaspoon crushed red pepper
1 cup crème fraîche
1/3 cup (about 1 1/2 ounces) shredded Gruyère cheese

Preheat oven to 400°.

Arrange squash on baking sheet coated with cooking spray. Drizzle with the oil, sprinkle with salt and pepper, and toss gently to combine. Bake at 400° for 20-30 minutes or until squash is tender.

Cook pasta 7 minutes or until almost al dente, omitting salt and fat. Add kale to pan during last 2 minutes of cooking. Drain pasta mixture.

Cook bacon in a large nonstick skillet over medium heat until crisp. Remove bacon from pan; crumble. Add onion to drippings in pan; cook 6 minutes, stirring occasionally. Add 1/2 teaspoon salt and garlic; cook 1 minute, stirring occasionally.

Once the pasta is done and drained, use the same pot to bring 1 3/4 cups of broth to a boil. Combine remaining 1/4 cup broth and flour in a small bowl, stirring with a whisk. Add flour mixture, 1/2 teaspoon salt, and red pepper to broth. Cook 2 minutes or until slightly thickened. Remove from heat; stir in crème fraîche.

Combine squash, pasta mixture, bacon, onion mixture, and sauce in a large bowl; toss gently. Place pasta mixture in a 13 x 9-inch glass or ceramic baking dish coated with cooking spray; sprinkle evenly with cheese. Bake at 400° for 25 minutes or until bubbly and slightly browned.

Saturday, February 25, 2012

Chicken Marsala Casserole

Please ignore the "casserole" in the title, unless casserole means to you things like easy to make, tasty, and inexpensive. But if it conjures up thoughts of canned veggies and condensed soup, take my advice and ignore it.

Because this ain't your momma's casserole (no offense to your momma).

This recipe was very tasty; it calls for fresh, easy to find ingredients and had a great flavor. More than that, it took me less than 10 minutes to get it prepped and in the oven! Gotta love a low maintenance meal every once in awhile!

Chicken Marsala Casserole
2 tbsp butter
10 oz sliced mushrooms
1 1/2 tbsp flour
1/2 cup marsala wine
1/2 cup heavy cream
2 cups chicken broth
1 tsp dried parsley
Salt and pepper
1 cup long grain rice, uncooked
2 cups cooked chicken, shredded or chopped
2 tbsp parmesan cheese, grated

Preheat the oven to 350.

Melt the butter in a large skillet. Add the mushrooms and cook for about 5 minutes, until softened.

Add the flour and stir well to coat.

Stir in the marsala wine and cream, allowing to cook and thicken, about 3 minutes. Stir in the broth, parsley, and season with salt and pepper.

In a 9x 13 dish, spread the rice in an even layer over the bottom of the dish. Top with the chicken.

Pour the mushroom gravy over the chicken and rice mix. Cover tightly with foil.

Bake 35 minutes, until bubbling.

Remove foil, sprinkle on parmesan cheese, and bake 5 minutes uncovered.

Source: Stephanie Cooks

Tuesday, February 21, 2012

Pork Schnitzel with Sauce

I think the first time I had pork schnitzel (and spaetzle) was at this great German restaurant in Fredericksburg, TX. I, of course, loved it! To be honest, for an "ethnic" food I don't think it's unusual at all for an American palate. It's really just a thin cutlet of pork that is breaded and fried. Yum! This recipe also has a great dipping sauce to go with it - though we actually just poured it right over our pork. :)

The pork is tender and flavorful (esp with the delicious dill flavored sauce!) and it cooks super fast. It was a big hit in this house!

Pork Schnitzel with Sauce
4 boneless pork chops
1/4 cup flour
1 teaspoon salt
1/4 teaspoon freshly ground black pepper
1 egg, beaten
2 tablespoons milk
1 cup panko bread crumbs
1 teaspoon ground paprika
1/4 cup vegetable oil
3/4 cup chicken stock
2 teaspoons chopped fresh dill
1/2 cup sour cream

Place the pork chops between two sheets of wax paper and pound to around 1/8 inch thick. Trim any fat from the edges, and make a few small slits along the edge to prevent the pork from curling during cooking.

Combine the flour, salt, and pepper in a shallow bowl. Whisk the egg and milk together in another shallow bowl until well blended, then mix the panko bread crumbs and paprika together in a third shallow bowl. Dredge the pork chops in the flour mixture one at a time, then dip them into the egg mixture followed by the panko mixture.               

Heat the vegetable oil in a large skillet over medium-high heat. Arrange no more than two pork chops in the skillet at a time, cooking until the meat is golden brown no longer pink in the center, 3 to 4 minutes on each side. Place the pork chops in a warm oven to keep warm.               

Pour the chicken stock into the skillet used to cook the pork. Reduce the heat to low, and scrape up any brown bits in the bottom of the pan. As the stock simmers, mix the dill and sour cream together in a bowl. Whisk about 1/4 cup of the hot stock into the sour cream mixture, then pour it back into the skillet. Heat until warm and thick, about 5 minutes. Serve with the pork chops.

Source: All Recipes

Sunday, February 19, 2012

Stewed Beef with Creamy Cheese Grits

Don't you agree that brown foods are the tastiest? Anytime I'm at a buffet or potluck, it seems my plate is mostly sporting a brown hue. Of course, typically, brown/beige foods are the worst ones we can eat but oh, so tasty.

They also don't photograph well. As seen above.

This meal was seriously good. Like, we kept snagging bites from the pot good.

It started out as a Pioneer Woman recipe that I kept tweaking due (largely) to laziness but also taste. She calls for a CAN of chipotle peppers in adobo. An 11 ounce can! Um, no thanks ~ I enjoy life with taste buds! So, I cut way back on that. And, it's originally a stovetop only recipe but I'm never home that long before a meal so I went with the crockpot. For the grits, I went back to an old favorite as my base instead of the longer cooking type.

It ended up being a very easy, quick meal that tasted much more complicated than it was. The beef is incredibly tender and flavorful and the grits are the perfect base. This recipe, as written, is not spicy at all. You can easily kick it up a few notches by throwing in a few jalepenos or more chipotle sauce. Or a can of chipotles :)

This recipe as written below makes enough for 8 - I cut it in half for 4 good portions

Stewed Beef with Creamy Cheese Grits
2 Tablespoons canola/vegetable oil
2 Tablespoons butter
3 pounds stew meat or diced chuck roast
2 tablespoons sauce from canned chipotle peppers in adobo sauce
4 cups low-sodium beef broth
5 cloves minced garlic
1 Tablespoon cumin
2 teaspoons chili powder
1.5 cups chopped onions
2 cups quick Grits
2 cups chicken (or beef) broth *I used beef, thus the darker color
2 roasted poblano chiles, chopped
4 teaspoons chopped garlic
1-2 cups heavy cream or half and half
2 cups grated cheese (cheddar would be great!)

Salt and pepper, to taste

To make the meat, heat 1 tablespoon oil and 1 tablespoon butter in large pan over high heat. Brown the stew meat about a minute. Add chipotle pepper sauce, 4 cups of beef broth, 1 cup chopped onion, minced garlic, cumin, and chili powder. Stir, then bring to a boil. Transfer to a crockpot, cover, and cook on low for 3-4 hours or until the meat is tender. Once the meat is tender, transfer mixture back to stovetop and simmer until the sauce thickens (10-15 minutes).

*If wanting to make stovetop only: Brown the meat in a large pot, add items, bring to boil then reduce to low, cover and simmer for 2 1/2 to 3 hours, or until the meat is fall-apart tender and the liquid is thick. (Watch the meat occasionally and add more beef broth as needed.)

About 20 minutes before dinner, make the grits. Heat remaining 1 tablespoon of both oil and butter. Add remaining 1/2 cup chopped onion, chopped garlic, and poblano chiles and cook until soft. Add cream and broth and bring to a simmer. Quickly whisk in grits. Stir constantly until grits thicken, adding more cream and/or broth as needed. Gently fold in cheese, salt, and pepper and let sit a few minutes before serving.

Serve pile of grits with stewed meat over the top.

Wednesday, February 15, 2012

Maple Glazed Salmon

Since the weather was nice for Valentines Day, we decided to go simple and grill some salmon. This recipe, from All Recipes, is super easy and very tasty to make. I changed it up by cooking it on a cedar plank on the grill but I'm going to include the cooking instructions as written, since many aren't using their grill at this time of year. I also doubled the sauce ingredients, though, because I think the dish is better if you brush more on before serving.

Be aware that cooking times depend greatly on the thickness of your salmon. Just keep an eye on it!

Maple Glazed Salmon
1/2 cup maple syrup
4 tablespoons soy sauce
2 clove garlic, minced
1/4 teaspoon ground black pepper
1 pound salmon

In a small bowl, mix the maple syrup, soy sauce, garlic, and pepper.

Place salmon in a shallow glass baking dish, and coat with half of the maple syrup mixture. Cover the dish, and marinate salmon in the refrigerator 30 minutes, turning once.

Preheat oven to 400 degrees F (200 degrees C).

Place the baking dish in the preheated oven, and bake salmon uncovered 20 minutes, or until easily flaked with a fork.

Brush on additional sauce just before serving.

Nutritional info


See Aimee Cook


Follow on Bloglovin

Designed by:

Munchkin Land Designs Elements by Amy Teets
I was featured, I was Featured by Addicted to Recipes
What's cooking, love?
Lil\'Luna
Mandy's Recipe Box
 
Designed by Munchkin Land Designs • Copyright 2012 • All Rights Reserved